

Table of contents
- Project Overview:
- Step 1: Launching Instances
- Step 2: Installing Ansible
- Step 3: Configuring Ansible Inventory
- Step 4: Copying SSH Keys
- Step 5: Managing Servers with Ansible
- Step 6 : Using Ad-hoc Commands for Insight:
- Step 7 : Launching a New Instance:
- Step 8 : Creating Playbooks
- Step 9 : Utilizing Roles for Modular Configuration Management
- Step 10 : Customizing NGINX Configuration with Ansible
- Step 11 : Importance of Inventory File
- Step 12 : Creating and Using the Inventory File
- Conclusion
In today's world of dynamic infrastructure and rapid deployment, efficient server management is crucial. Ansible, with its powerful automation capabilities, simplifies this process by allowing you to define and manage infrastructure as code. In this comprehensive guide, we'll walk through a hands-on Ansible project, detailing each step with commands and code snippets.
Project Overview:
In this project, we aim to demonstrate the capabilities of Ansible for automating various aspects of IT infrastructure management. We'll cover a range of tasks, including server provisioning, software installation, configuration management, and more. By leveraging Ansible's simplicity and flexibility, we'll streamline these processes and showcase the efficiency gains achieved through automation. Throughout the project, we'll provide step-by-step instructions, explanations, and examples to guide you through the implementation of Ansible in real-world scenarios. Whether you're new to Ansible or looking to enhance your automation skills, this project will offer valuable insights and practical experience. Let's dive in!
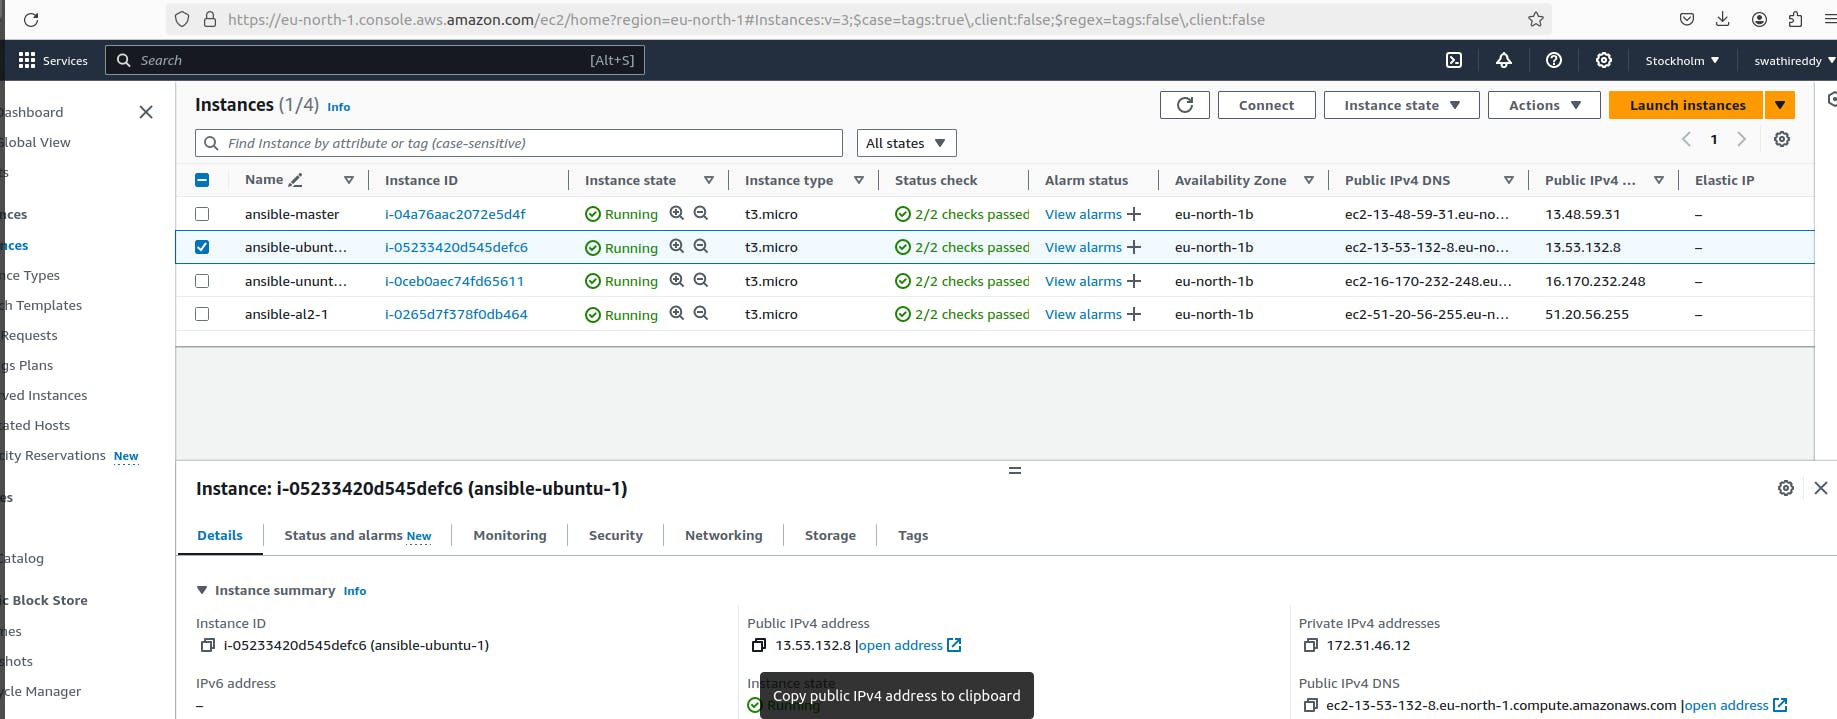
Step 1: Launching Instances
Using the AWS Management Console, launch three Ubuntu instances with the specified configurations.

Connecting to ansible-master
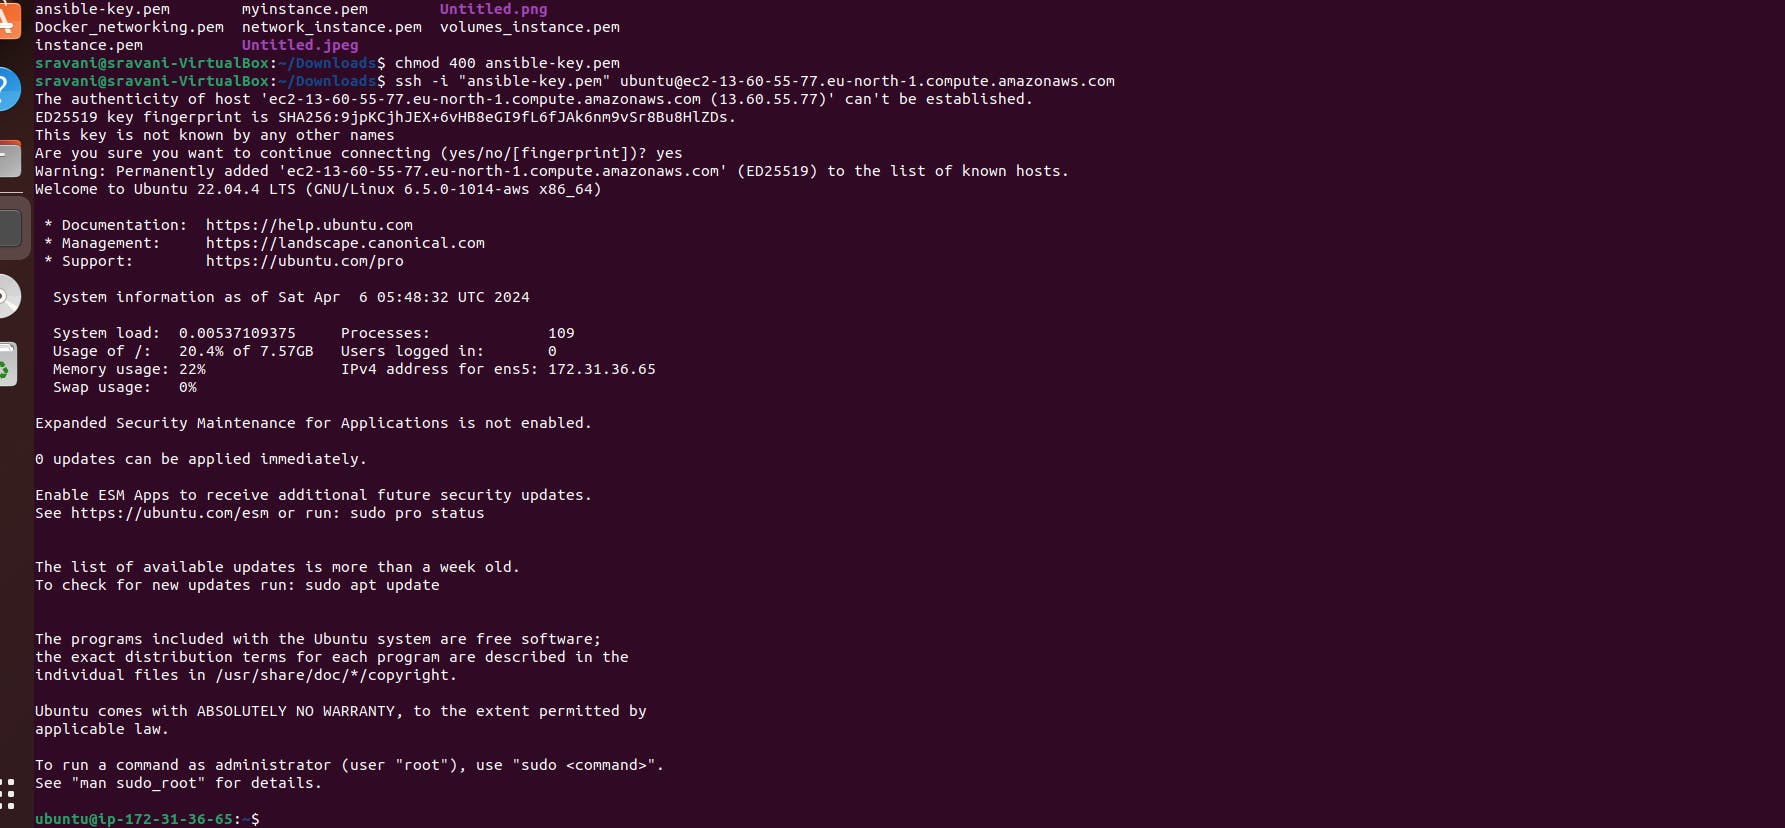
Connect to the ansible-master instance via SSH using the provided key pair.
ssh -i "ansible-key.pem" ubuntu@ec2-16-171-155-127.eu-north-1.compute.amazonaws.com
Step 2: Installing Ansible
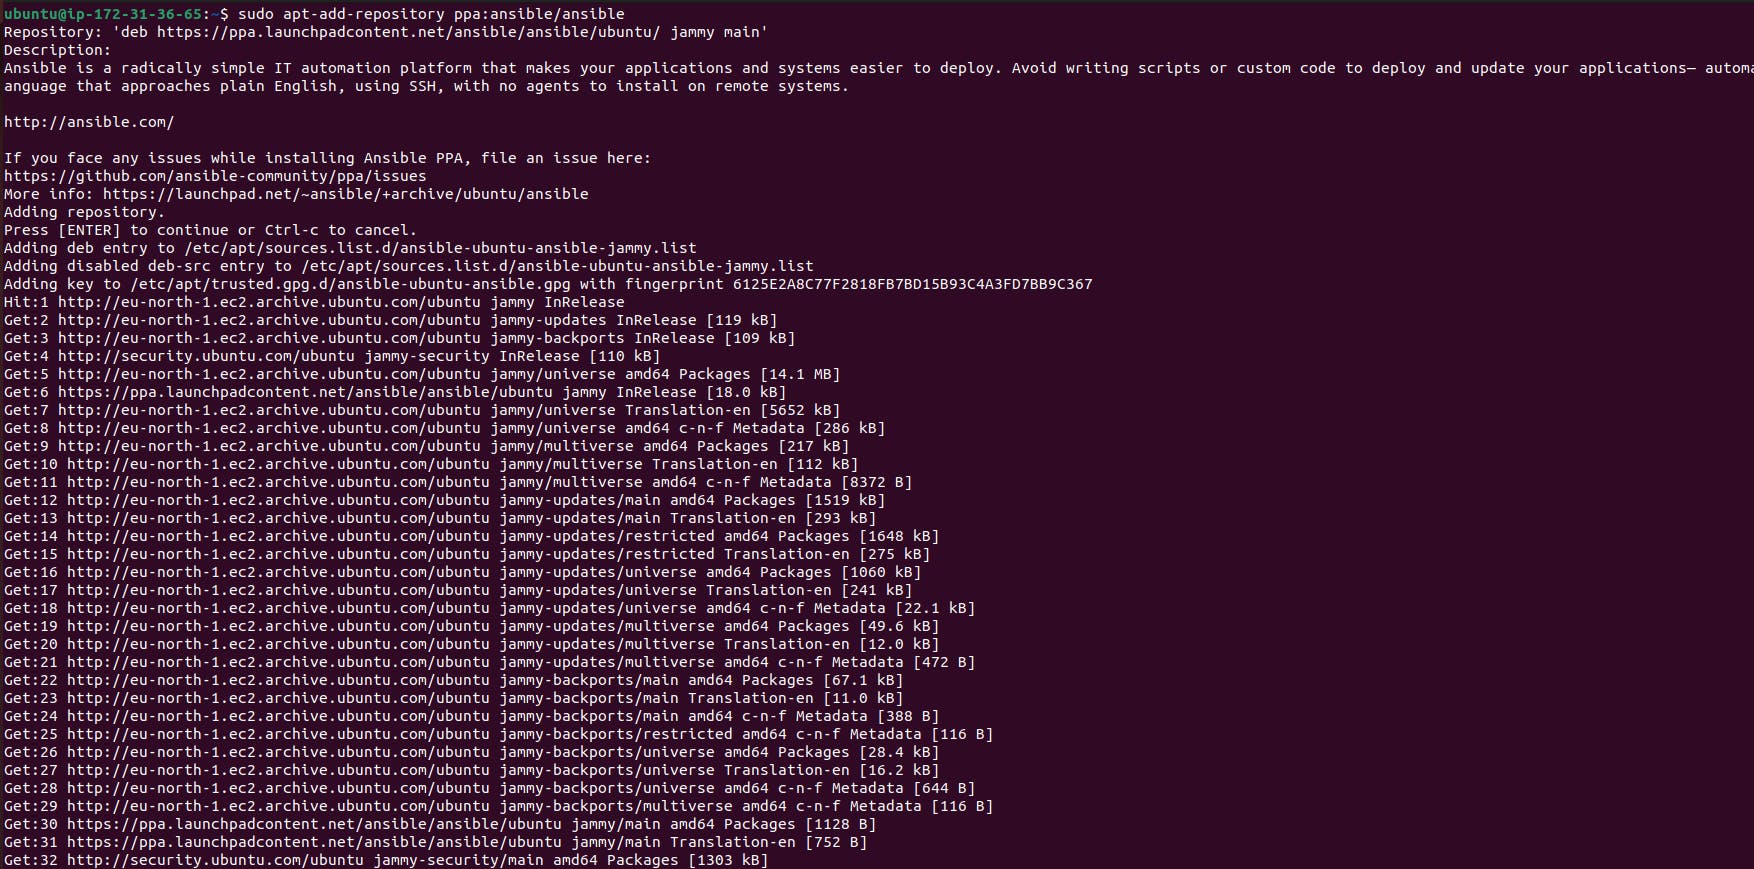
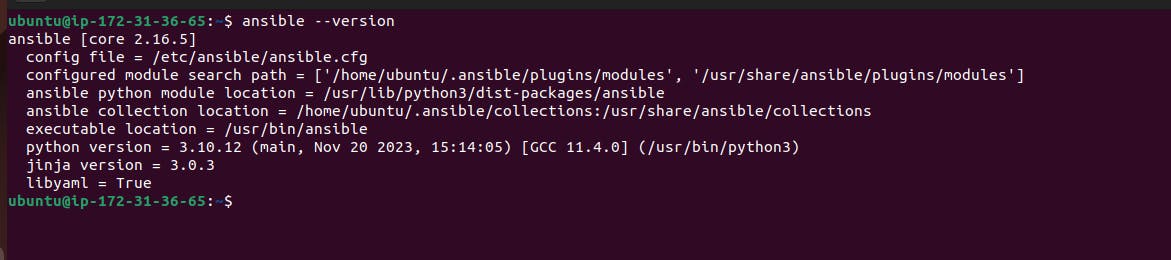
Install Ansible on ansible-master using the following commands:
sudo apt-add-repository ppa:ansible/ansible
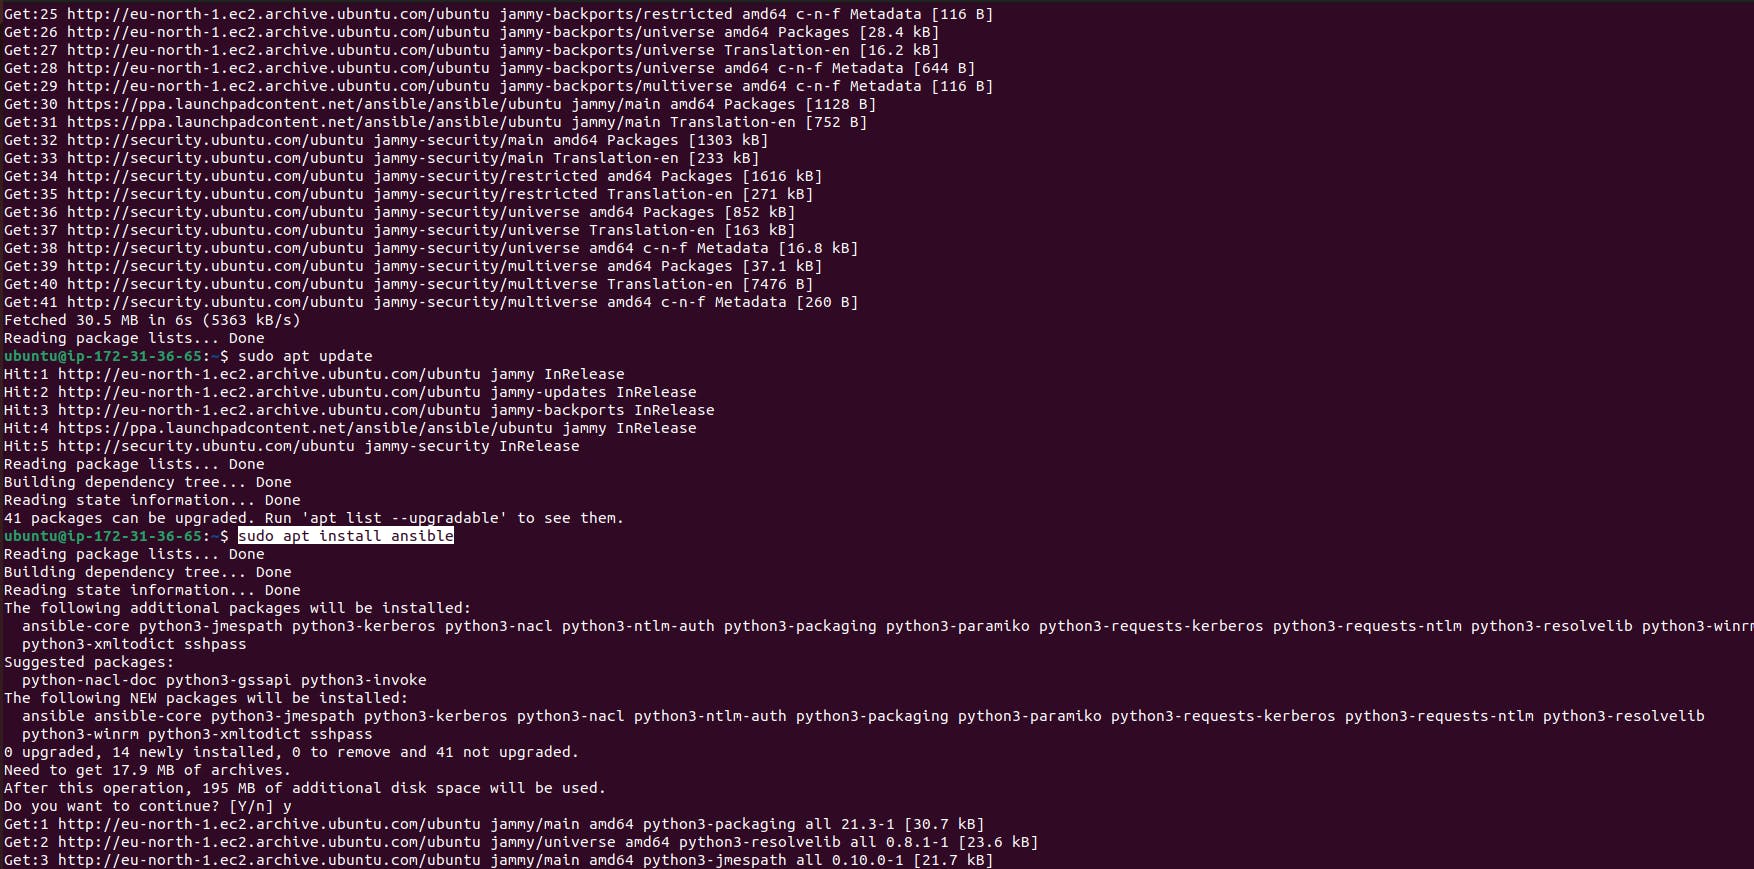
sudo apt update
sudo apt install ansible
ansible --version
Step 3: Configuring Ansible Inventory
Edit the Ansible inventory file (/etc/ansible/hosts) to define the servers we want to manage.
sudo vim /etc/ansible/hosts
Step 4: Copying SSH Keys
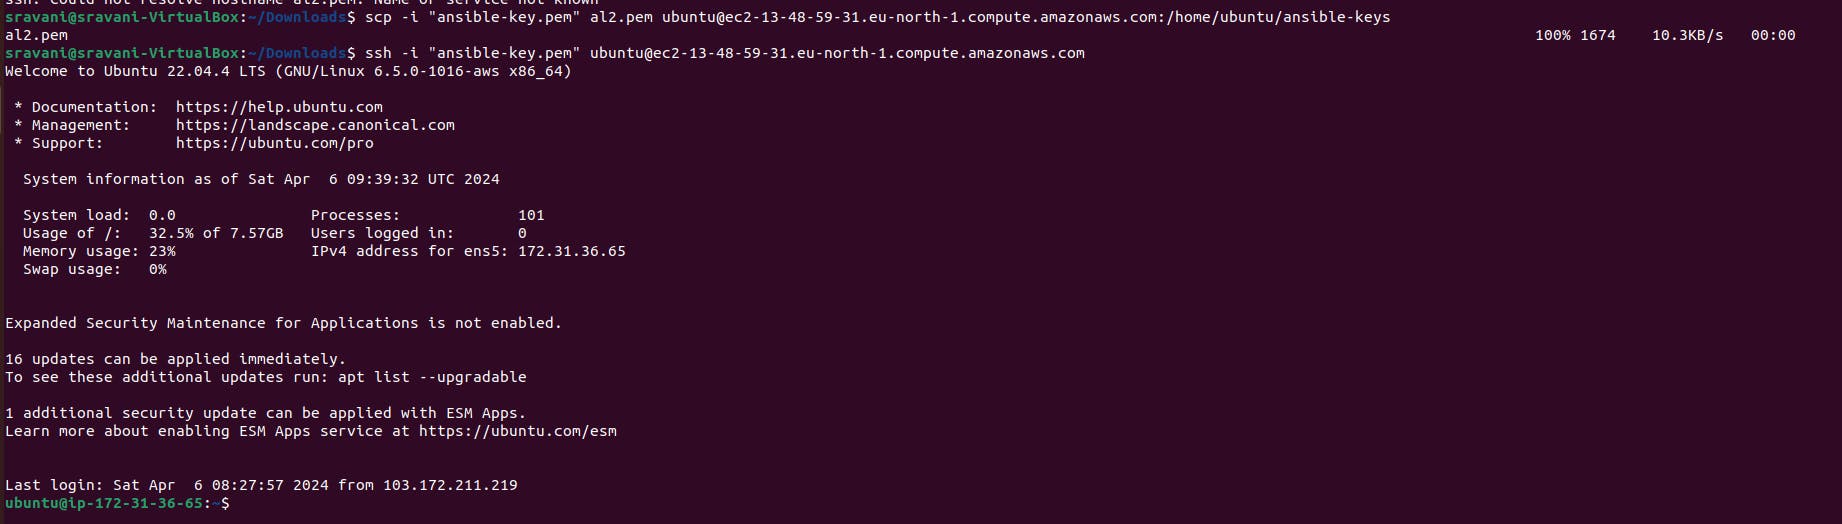
Copy the SSH private keys of the instances to ansible-master for seamless communication.
scp -i "ansible-key.pem" ansible-key.pem ubuntu@ec2-16-171-155-127.eu-north-1.compute.amazonaws.com:/home/ubuntu/ansible-keys


Step 5: Managing Servers with Ansible
In this part, we are configuring the Ansible inventory file (/etc/ansible/hosts) to define the servers we want to manage and setting up some variables for these servers.
Editing the Ansible Inventory File: We use the vim text editor to open the Ansible inventory file:
sudo vim /etc/ansible/hosts
Inside the file, we define a group named [servers] and add the IP addresses of our servers (server1 and server2) along with their corresponding Ansible hostnames using the ansible_host parameter.
Exiting and Saving the File: After adding the server details, we save and exit the file using the following commands in vim:Esc:wq!
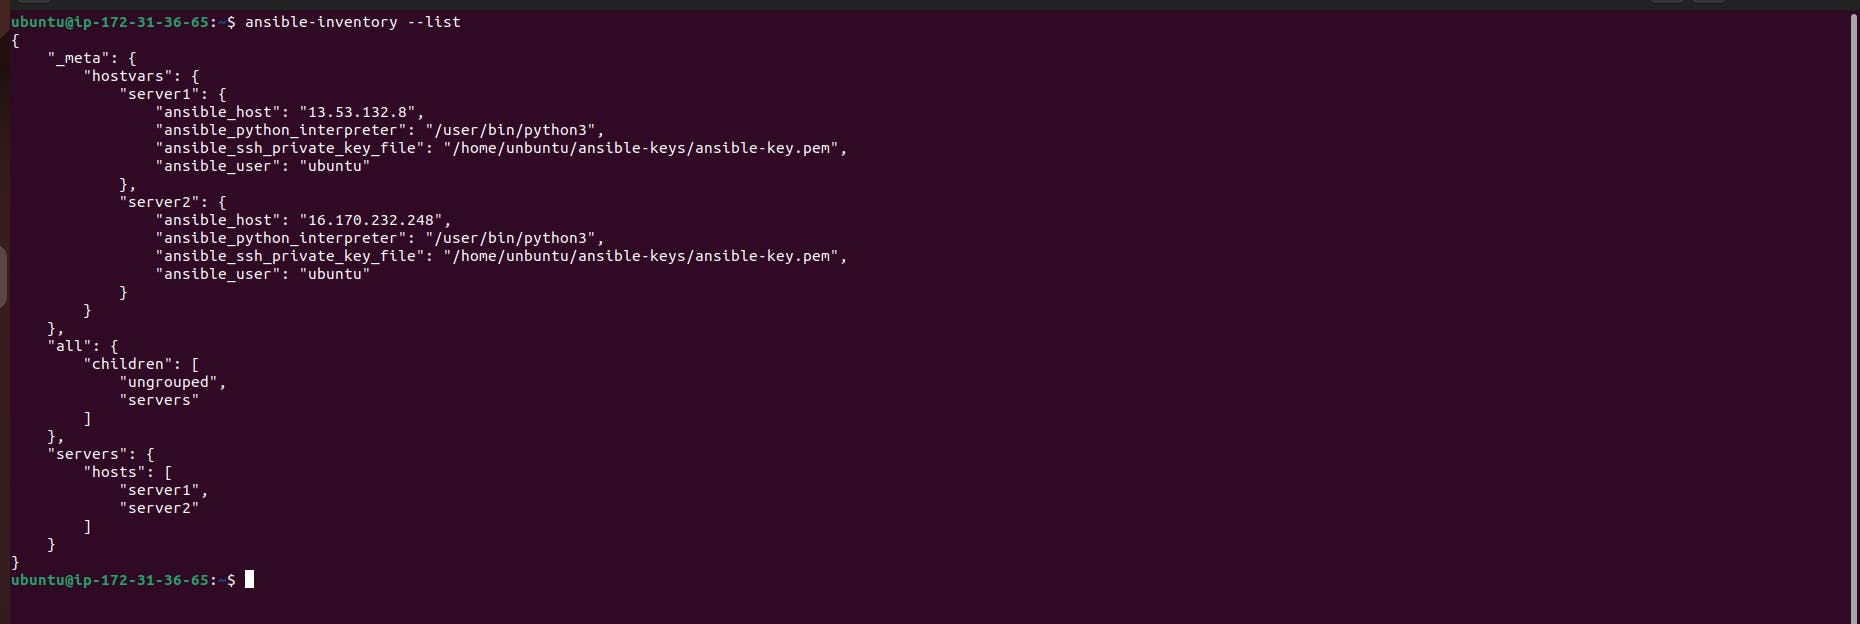
Checking the Inventory: After modifying the inventory file, we use the ansible-inventory command to list the configured inventory:
ansible-inventory --list
Setting up Variables: Then, we set up some variables for our servers by again editing the Ansible inventory file:
sudo vim /etc/ansible/hosts
[servers]
server1 ansible_host=18.222.140.54
server2 ansible_host=18.222.79.227
[servers:vars]
ansible_python_interpreter=/user/bin/python3
ansible_user=ubuntu
ansible_ssh_private_key_file=/home/ubuntu/ansible-keys/ansible-key.pem

Inside the file, we add variables under a group named [servers:vars]. These variables include the Python interpreter path, the username (ansible_user), and the path to the SSH private key file (ansible_ssh_private_key_file).
Exiting and Saving the File: After adding the variables, we save and exit the file using the following commands in vim: Esc:wq!
Checking Connectivity: Finally, we verify the connectivity to the servers by running a simple ping test using the ansible command:
ansible -m ping servers

If the servers respond successfully to the ping test, it indicates that Ansible can communicate with them effectively.
This process ensures that Ansible has the necessary information to manage the specified servers and that it can establish connections to them successfully. It lays the foundation for further automation and management tasks using Ansible.
Step 6 : Using Ad-hoc Commands for Insight:
Once connectivity is established, administrators can leverage Ansible's ad-hoc commands to gather valuable insights from the managed servers. Let's break down some of these commands:
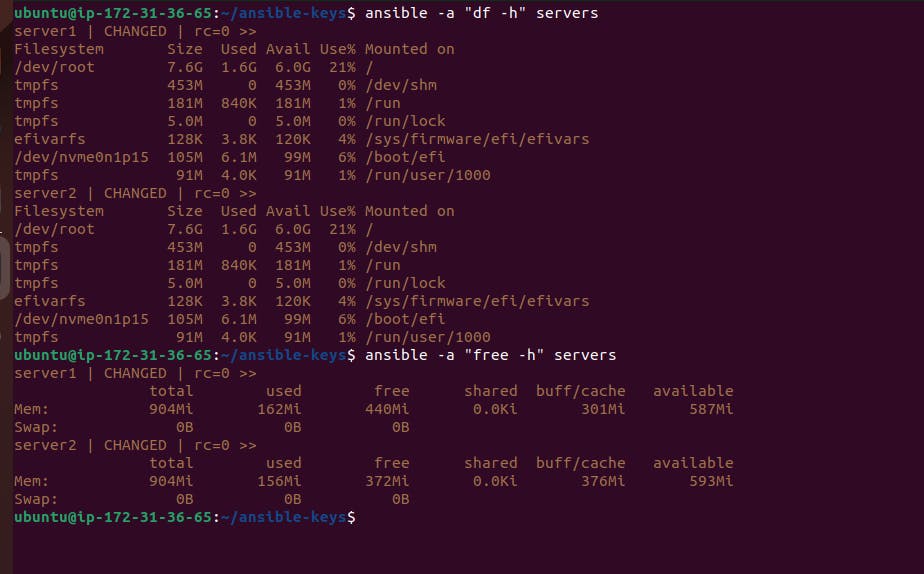
Gathering Disk Usage Information:
ansible -a "df -h" servers
Explanation:
ansible: Initiates the execution of an ad-hoc command.
-a "df -h": Specifies the command to run (df -h displays disk space usage in a human-readable format).
servers: Refers to the group of servers defined in the Ansible inventory.
This command retrieves disk usage information from server1 and server2, providing administrators with insights into storage utilization across the infrastructure.
Checking Memory Usage:
ansible -a "free -h" servers
Explanation:
ansible: Similar to the previous command, initiates an ad-hoc command.
-a "free -h": Executes the free -h command, which displays memory usage in a human-readable format.
servers: Again, specifies the group of servers to target.
By executing this command, administrators can obtain memory usage details from the managed servers, aiding in capacity planning and resource optimization efforts.
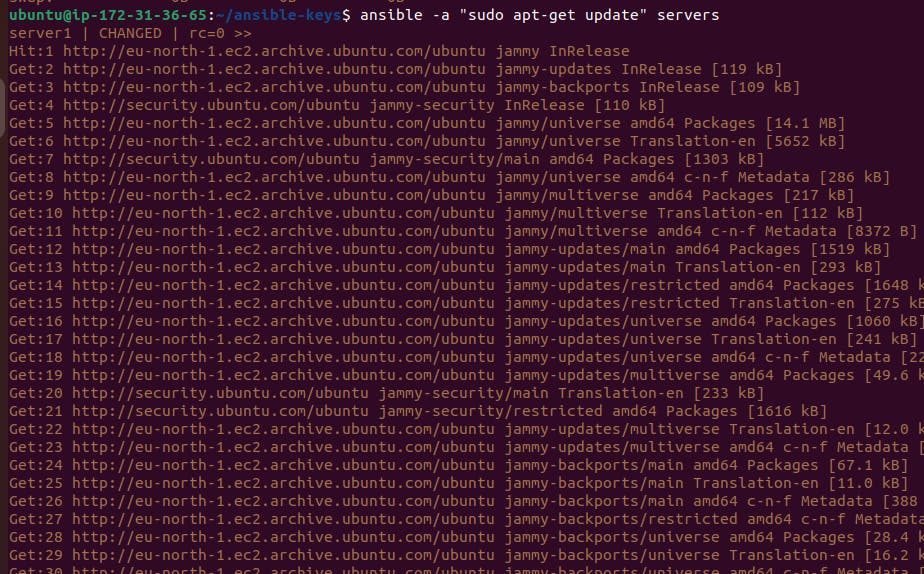
Performing Updates:
Keeping servers up-to-date with the latest software patches and updates is critical for security and performance. Ansible simplifies this process with ad-hoc commands:
ansible -a "sudo apt-get update" servers
Explanation:
ansible: Initiates an ad-hoc command.-a "sudo apt-get update": Executes thesudo apt-get updatecommand, which updates the package repositories and retrieves information about available package updates.servers: Targets the group of servers defined in the inventory.
Executing this command ensures that all servers receive the latest package information, allowing administrators to maintain a secure and optimized server environment effortlessly.
In conclusion, Ansible's ad-hoc commands provide a straightforward yet powerful means of managing servers efficiently. By leveraging these commands, administrators can gather essential system information, perform routine maintenance tasks, and ensure the overall health and security of their infrastructure with ease.
Certainly! Here's an explanation of the steps to launch a new instance, connect it to the Ansible master server, and configure it for management:
Step 7 : Launching a New Instance:
Navigate to the AWS Management Console and select "Launch Instance."
Name the instance "ansible-al2-1" and choose the "Amazon Linux 2" AMI.
Select the desired instance type, such as t2.micro, and configure any additional settings as needed.
Create a new key pair or select an existing one to enable SSH access to the instance.
Launch the instance.
Copying SSH Key to the Master Server:
Open a terminal on your local machine.
Use the
scpcommand to securely copy the SSH key (al2-key.pem) from your local machine to the Ansible master server:scp -i "ansible-key.pem" al2-key.pem ubuntu@ec2-16-171-155-127.eu-north-1.compute.amazonaws.com:/home/ubuntu/ansible-keys
This command copies the SSH key to the
/home/ubuntu/ansible-keysdirectory on the Ansible master server.
Confirming Key Transfer:
Log in to the Ansible master server via SSH.
Check that the SSH key (
al2-key.pem) has been successfully copied to the server by listing the contents of theansible-keysdirectory:ls /home/ubuntu/ansible-keys
You should see the
al2-key.pemfile listed, confirming its presence on the server.
Configuring Ansible Inventory:
Open the Ansible inventory file (
/etc/ansible/hosts) for editing:sudo vim /etc/ansible/hostsAdd a new group
[demo]and define the new server (server3) with its public IP address (3.19.53.100):[demo] server3 ansible_host=3.19.53.100Specify variables for the
[demo]group, such as Python interpreter path, username, and SSH private key file:[demo:vars] ansible_python_interpreter=/usr/bin/python3 ansible_user=ec2-user ansible_ssh_private_key_file=/home/ubuntu/ansible-keys/al2-key.pemSave and exit the file (
:wqin Vim).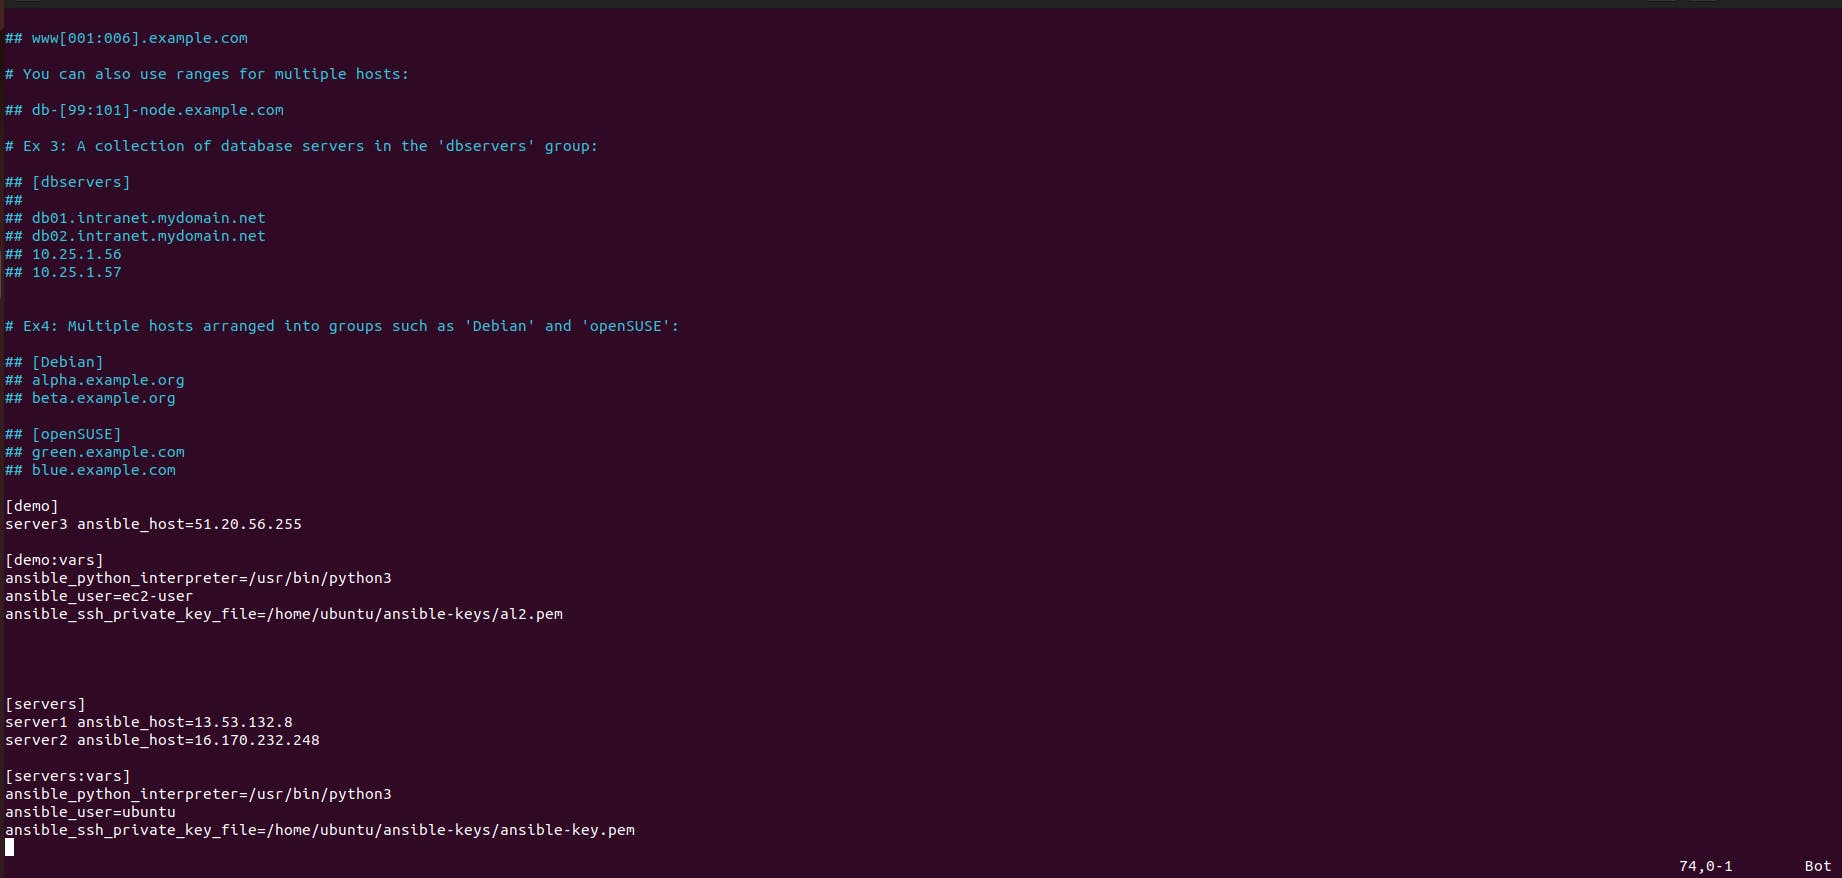
Verification:
Confirm that the new server (
server3) has been successfully added to the Ansible inventory:chmod 400 al2-key.pem ansible-inventory --list ansible -m ping demo


This command should display the inventory with the newly added server included.
By following these steps, you can seamlessly launch a new instance, integrate it with the Ansible master server, and configure it for management alongside existing servers.
Step 8 : Creating Playbooks
Creating Playbooks:
Playbooks in Ansible are YAML files that define a set of tasks to be executed on remote hosts. These tasks can include system administration tasks, configuration management, and more.
Navigate to the directory where you want to store your playbooks. For example, create a directory named
playbooks:cd .. mkdir playbooks cd playbooksHere, you can create YAML files for different playbooks, each containing a set of tasks.
Running Ad-Hoc Commands:
Ad-hoc commands are one-liner commands that you can run directly from the command line to perform quick tasks on remote hosts.
For example, to check the date on all servers, you can use the
ansiblecommand with the-aflag followed by the command you want to run:ansible -a "date" servers
Creating Playbooks for Specific Tasks:
Playbooks allow you to define a series of tasks to be executed in a specific order on targeted hosts.
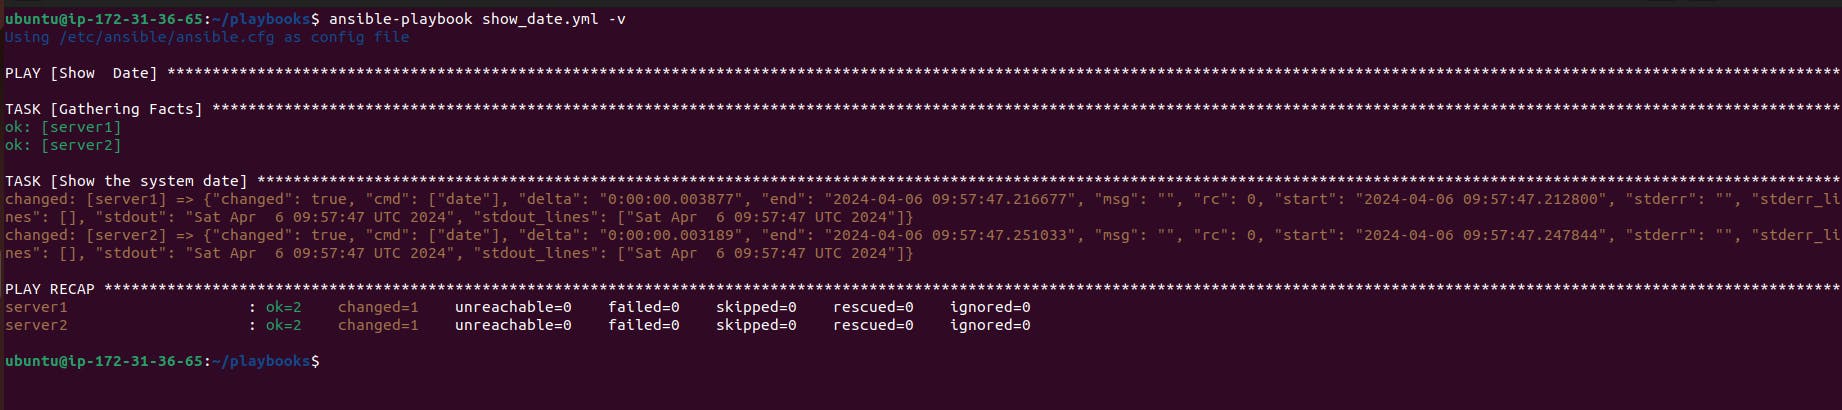
For instance, you can create a playbook named
show_date.ymlto display the system date on all servers:--- - name: Show Date hosts: servers tasks: - name: Show the system date command: date
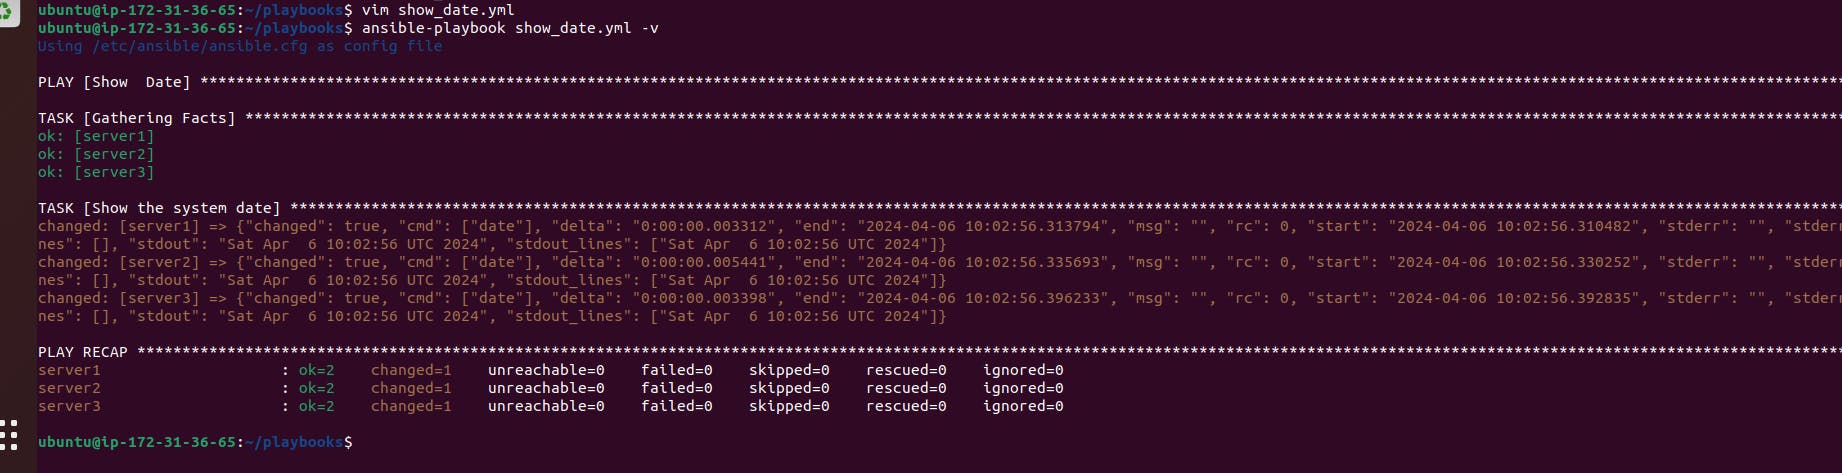
After creating the playbook, you can execute it using the
ansible-playbookcommand:ansible-playbook show_date.yml -v

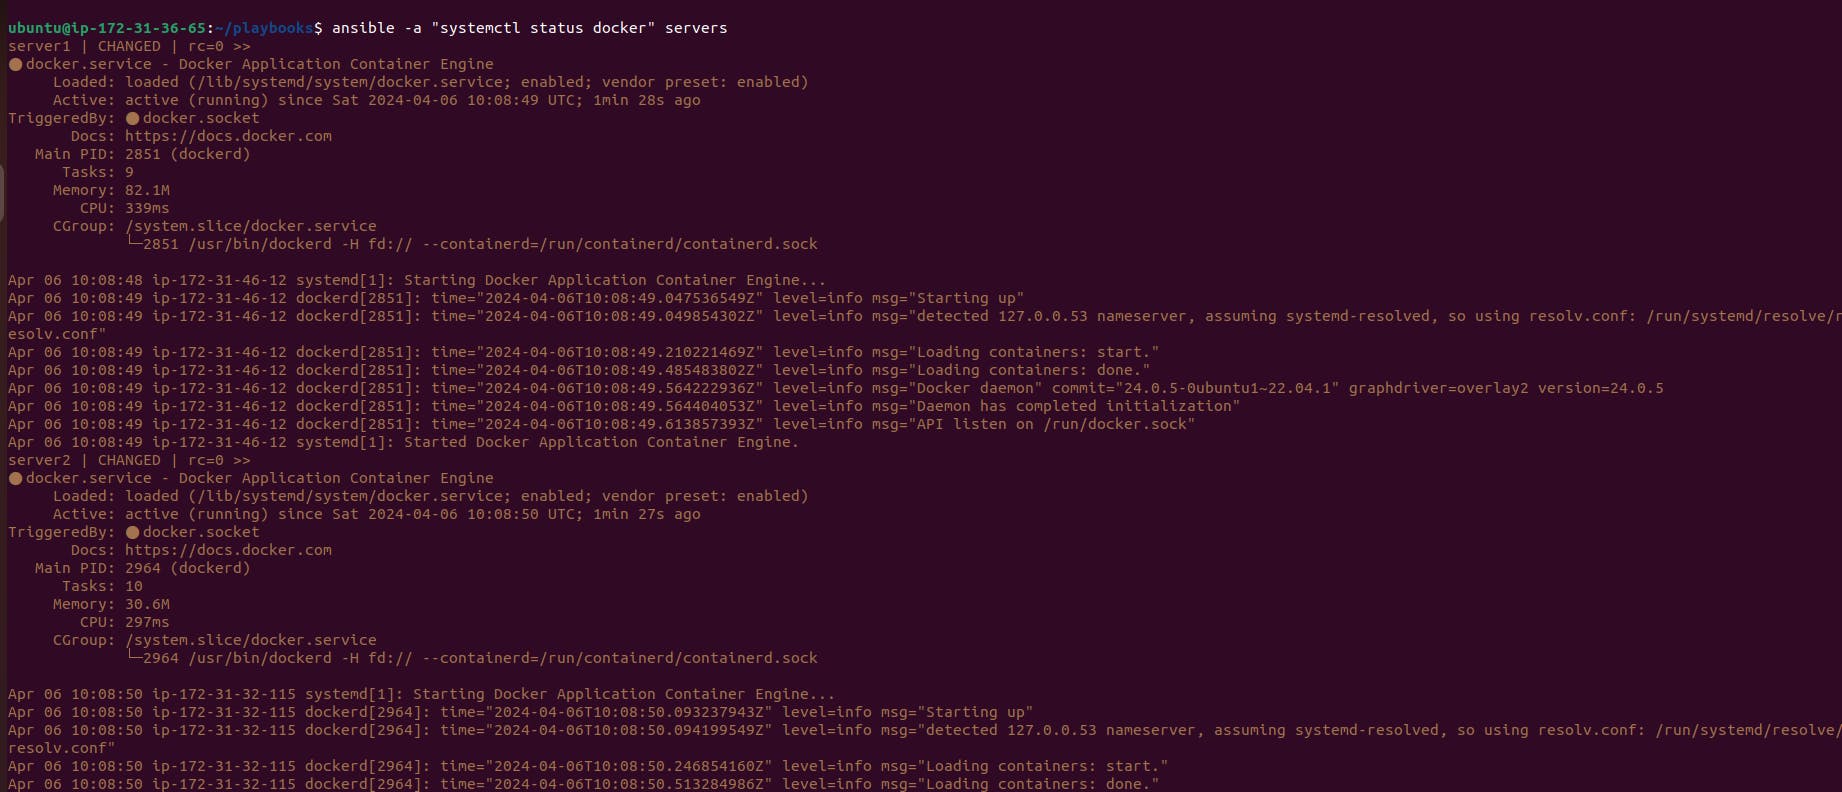
Installing Docker using Playbooks:
Playbooks are also useful for automating the installation and configuration of software packages across multiple servers.
For example, you can create a playbook named
install_docker.ymlto install Docker on targeted servers:--- - name: Docker Installation hosts: servers become: true tasks: - name: Install Docker apt: name: docker.io state: latest - name: Enable Docker service: name: docker state: started enabled: yes
Execute the playbook to install Docker on the specified servers:
ansible-playbook install_docker.yml

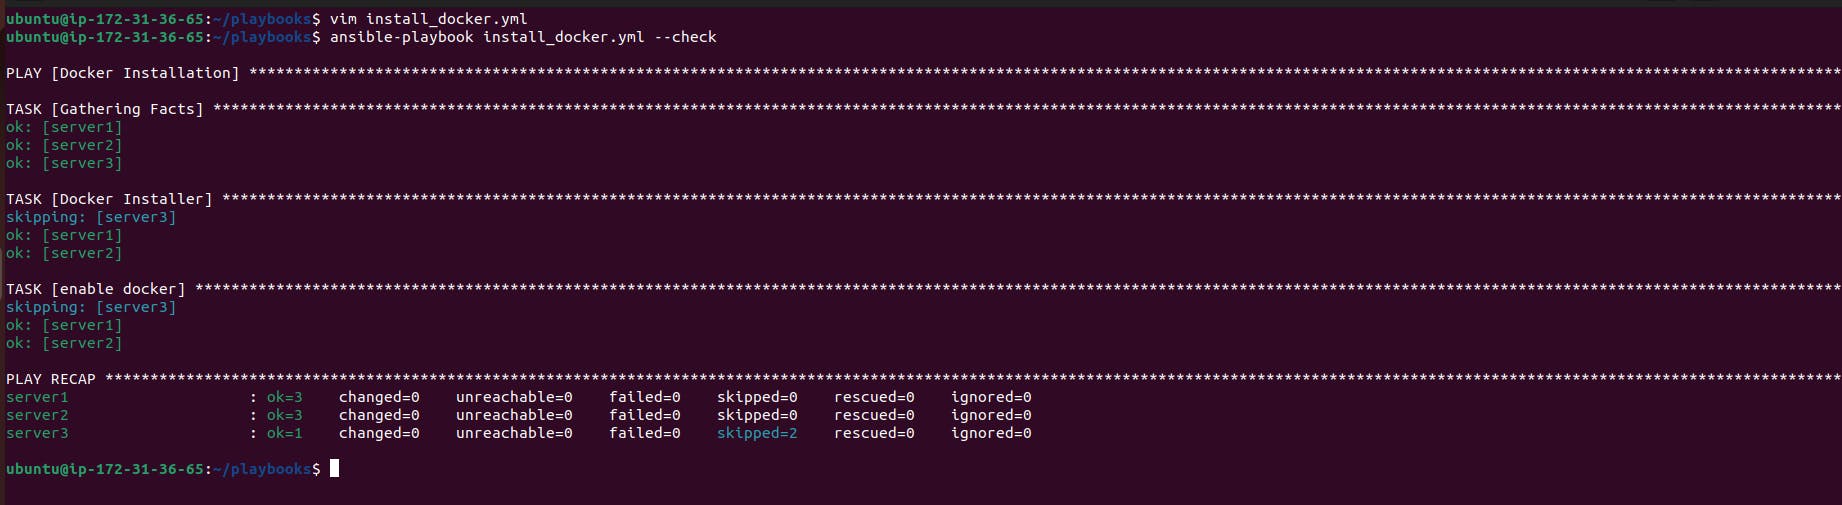
Using Conditions in Playbooks:
Ansible allows you to apply conditions to tasks based on certain criteria, such as the target host's operating system.
You can use the
whencondition to execute tasks conditionally. For example, to install Docker only on Ubuntu servers:--- - name: Docker Installation hosts: all become: true tasks: - name: Install Docker apt: name: docker.io state: latest when: ansible_distribution == "Ubuntu" - name: Enable Docker service: name: docker state: started enabled: yes when: ansible_distribution == "Ubuntu"

These are some basic examples of how to use playbooks in Ansible to automate tasks and configurations across your infrastructure. Playbooks provide a flexible and powerful way to manage and orchestrate your server environment.
Step 9 : Utilizing Roles for Modular Configuration Management
In this step, we'll delve into the concept of roles in Ansible, which allows for modular organization and reuse of configuration tasks.
Creating Roles:
Roles are a way to organize tasks, variables, and handlers into reusable units. They provide a structured approach to managing configurations across different servers or applications.
To create a new role, use the
ansible-galaxy initcommand followed by the name of the role. For instance, to create an NGINX role:sudo ansible-galaxy init nginx
This command initializes a new role directory structure with predefined directories for tasks, handlers, variables, and more.
Defining Tasks within Roles:
Tasks within roles are defined in YAML files and specify the actions to be performed on targeted hosts.
Navigate to the directory of the newly created role. For example:
cd /etc/ansible/roles/nginxWithin the role directory, you'll find a
tasksdirectory containing amain.ymlfile where you can define tasks associated with the NGINX role.
Using Roles in Playbooks:
Once a role is created, you can easily include it in your playbooks to leverage its functionality across multiple hosts.
Create a playbook named
install_nginx.ymland specify the NGINX role to be executed:--- - name: Install NGINX using Roles hosts: servers become: true roles: - nginx
This playbook instructs Ansible to apply the NGINX role to the specified hosts (
servers) and execute the tasks associated with it.
Executing Playbooks with Roles:
Run the playbook using the
ansible-playbookcommand:ansible-playbook install_nginx.yml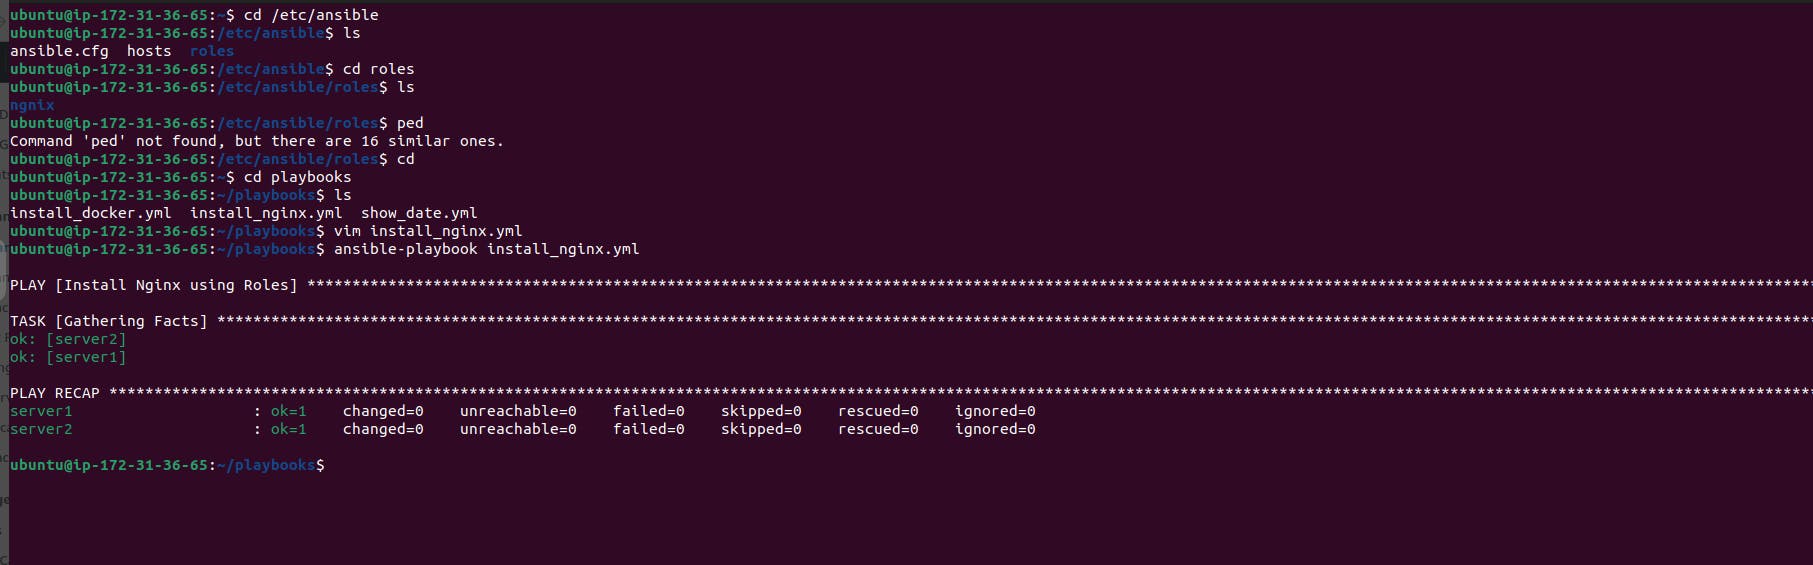
Ansible will execute the tasks defined within the NGINX role on the targeted hosts, ensuring that NGINX is installed and configured according to the role's specifications.
Benefits of Roles:
Roles promote code reuse and maintainability by encapsulating common configurations into modular units.
They simplify playbook management by organizing tasks, variables, and handlers into logical components.
Roles enhance scalability and consistency across infrastructure by providing a standardized approach to configuration management.
By incorporating roles into your Ansible workflow, you can streamline the management of complex configurations and infrastructure deployments, ultimately improving efficiency and maintainability.
Step 10 : Customizing NGINX Configuration with Ansible
In this step, we'll customize the NGINX configuration and deploy a static webpage using Ansible.
Updating NGINX Tasks:
Navigate to the tasks directory of the NGINX role:
cd /etc/ansible/roles/nginx/tasks/Open the
main.ymlfile for editing:sudo vim main.ymlAdd a new task to deploy an
index.htmlfile to the NGINX web server:--- # Tasks file for NGINX - name: Install NGINX ansible.builtin.package: name: nginx state: present - name: Ensure NGINX is running ansible.builtin.service: name: nginx state: started enabled: yes - name: Deploy index.html ansible.builtin.copy: src: index.html dest: /var/www/html/index.htmlSave and exit the file (
:wqin Vim).
Creating the Index.html File:
Navigate to the playbooks directory:
cd ~/playbooks/Create and edit the
index.htmlfile:vim index.htmlPaste the desired HTML content for your webpage into the file.
Save and exit Vim (
:wq).
Copying Index.html to NGINX Role:
Return to the NGINX role directory:
cd /etc/ansible/roles/nginx/Copy the
index.htmlfile from the playbooks directory to thefilesdirectory within the NGINX role:sudo cp ~/playbooks/index.html files/
Executing the Playbook:
Navigate back to the playbooks directory:
cd ~/playbooks/Run the playbook to install NGINX and deploy the customized webpage:
ansible-playbook install_nginx.yml
Verifying NGINX Installation:
After the playbook execution completes successfully, open a web browser.
Enter the public IP address of either
server1orserver2in the address bar.You should see the customized webpage served by NGINX.

By following these steps, you can easily customize NGINX configuration and deploy a static webpage using Ansible, automating the process and ensuring consistency across your server infrastructure.
Step 11 : Importance of Inventory File
The inventory file in Ansible plays a crucial role in orchestrating infrastructure automation. Here's why it's important:
Organization: It helps organize hosts into logical groups, making it easier to manage and perform tasks on specific sets of servers.
Targeting: With the inventory file, you can precisely target hosts or groups of hosts for executing Ansible tasks, ensuring that changes are applied only where intended.
Dynamic Management: Ansible supports dynamic inventory scripts, allowing for automatic updates to inventory based on changes in the infrastructure.
Variable Definition: Inventory files can define variables that can be used to customize configurations or behavior across different hosts or groups.
Environment Separation: It enables the separation of hosts into different environments (e.g., production, staging, development), ensuring that configuration changes are applied appropriately.
Documentation: Serving as a centralized source of information, the inventory file documents the infrastructure setup, making it easier for teams to collaborate and understand the environment.
Security: By specifying connection parameters such as usernames, SSH keys, and other authentication details, the inventory file enhances access control and security.
Step 12 : Creating and Using the Inventory File
Create Directory: Start by creating a directory to store your inventory files.
 mkdir inventories
 cd inventories/
Create Inventory File: Use a text editor to create a new inventory file. Here, we create a file named
prd_inventory.vim prd_inventoryAdd Hosts: Define your hosts in the inventory file, grouping them as needed and specifying connection parameters.
 [prd-server]
 server1 ansible_host=18.222.140.54

 [prd-server:vars]
 ansible_python_interpreter=/user/bin/python3
 ansible_user=ubuntu
 ansible_ssh_private_key_file=/home/ubuntu/ansible-keys/ansible-key.pem
Save and exit the file (
:wqin Vim).
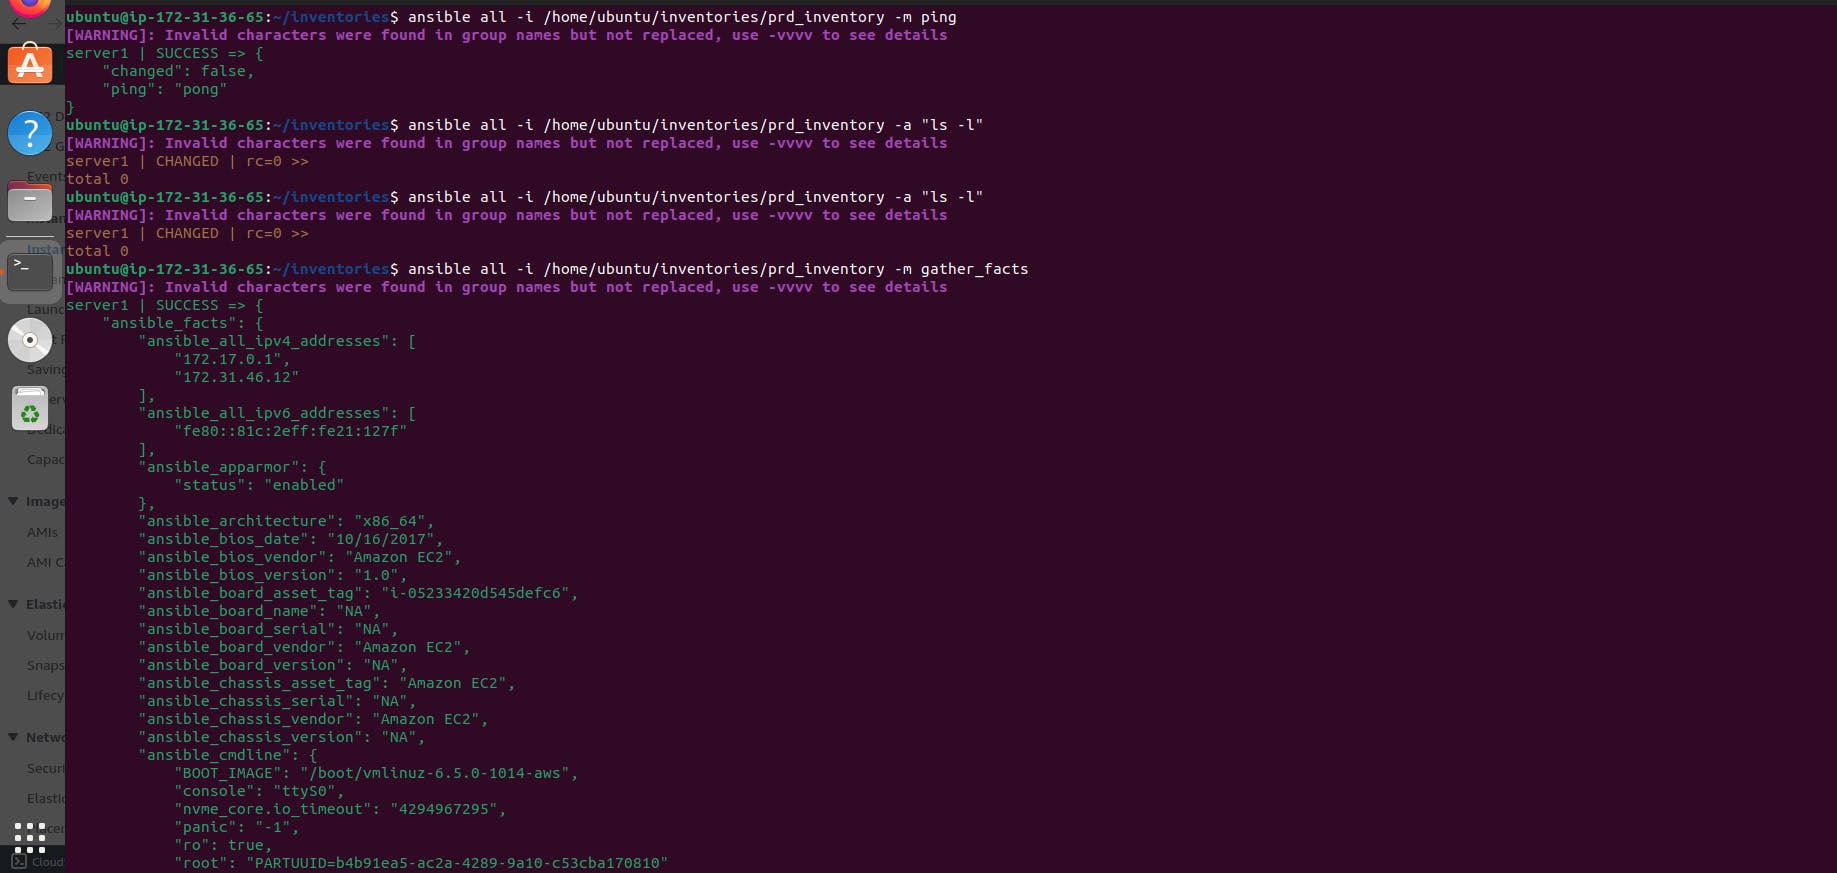
Execute Ad-hoc Commands: You can now use Ansible to execute ad-hoc commands against the hosts defined in the inventory file.
Run an ad hoc command to check the uptime of all servers listed in the prd_inventory file:
ansible all -i /home/ubuntu/inventories/prd_inventory -a "uptime"

Check the disk usage of all servers:
ansible all -i /home/ubuntu/inventories/prd_inventory -a "df -h"
View the memory usage of all servers:
ansible all -i /home/ubuntu/inventories/prd_inventory -a "free -h"
The inventory file is essential for effective infrastructure management and ensures that Ansible tasks are executed accurately and securely.
Conclusion
In this project, we embarked on a journey to harness the power of Ansible for automating various aspects of IT infrastructure management. Beginning with the provisioning of AWS instances, we swiftly configured Ansible on a master node, fostering seamless communication with multiple servers. Through meticulous steps, we demonstrated the execution of ad-hoc commands, the creation of playbooks, and the utilization of roles for orchestrating deployments of pivotal services like Nginx and Docker. With a keen emphasis on the significance of inventory files for organizing server groups and employing ad-hoc commands for swift troubleshooting, we unraveled the transformative potential of Ansible's declarative language and idempotent design, empowering teams to streamline operations and enhance system reliability.
Through this project, we've unlocked a world of automation possibilities with Ansible, offering a roadmap for organizations seeking to optimize their IT infrastructure management processes. By embracing Ansible's efficiency, consistency, and scalability, teams can redirect their focus towards strategic initiatives, accelerating application delivery and bolstering operational agility. As we conclude this journey, the project stands as a testament to Ansible's role in driving innovation and efficiency in modern IT landscapes, equipping practitioners with the tools needed to thrive in an ever-evolving technological ecosystem.