Unlocking Infrastructure Management: Terraform Essentials - Day 1 of TerraWeek


Introduction:
Welcome to TerraWeek, a journey into the realm of Terraform - a powerful tool that transforms the way we manage infrastructure. In this comprehensive guide, we'll dive deep into Terraform, from understanding its core concepts to practical implementation, empowering you to leverage infrastructure as code efficiently.
What is Terraform and its Importance?
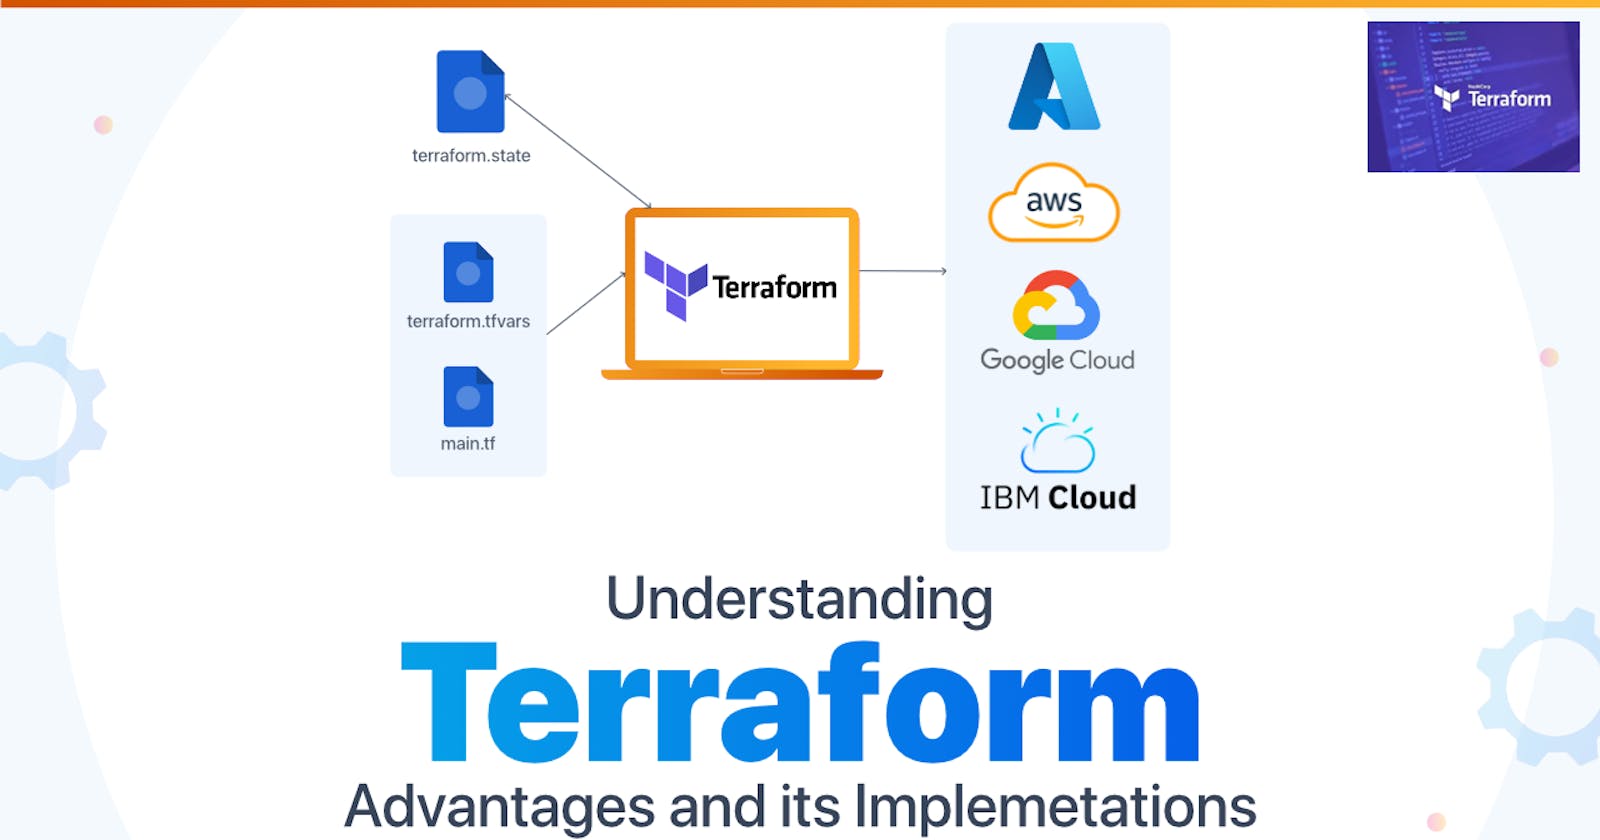
Terraform, developed by HashiCorp, is an open-source Infrastructure as Code (IaC) tool. It enables users to define and provision infrastructure using declarative configuration files, offering a consistent and reproducible approach to infrastructure management. With Terraform, you can manage resources across various cloud providers (such as AWS, Azure, GCP) and on-premises environments seamlessly.
Why Terraform?
Traditional infrastructure provisioning involves manual processes that are error-prone and time-consuming. Terraform simplifies this by automating the deployment and management of infrastructure, facilitating version control and collaboration. By abstracting complexities, Terraform enhances efficiency, scalability, and reliability in infrastructure management.
Installing Terraform and Setting up Environment:
Download Terraform: Begin by visiting the official Terraform website (https://www.terraform.io/downloads.html) and download the appropriate package for your operating system (Windows, macOS, Linux).
Installation: Once downloaded, follow the installation instructions provided for your respective operating system. For instance, on Linux, you can extract the downloaded archive and move the binary to a directory included in your system's PATH.
Environment Setup: After installing Terraform, you need to set up environment variables for authentication with your preferred cloud provider(s) (AWS, Azure, GCP). These credentials will enable Terraform to interact with the respective APIs and provision resources. You can set environment variables for authentication keys, regions, and other necessary parameters.
Setting Up Terraform on Linux: Let's Explore the Installation Step by Step
Certainly! Setting up Terraform on Linux involves downloading the Terraform binary and configuring it for use. Here's a step-by-step guide on how to do it:
Download Terraform Binary:
First, you need to download the Terraform binary suitable for your Linux distribution. You can do this by visiting the official Terraform website's download page: Terraform Downloads.
Alternatively, you can use
wgetorcurlcommand to download the binary directly from the terminal. For instance, to download the latest version of Terraform for Linux 64-bit, you can usewget:wget https://releases.hashicorp.com/terraform/<version>/terraform_<version>_linux_amd64.zipReplace
<version>with the desired Terraform version.Extract the Binary:
After downloading the Terraform binary, you need to extract it from the downloaded archive. You can use the
unzipcommand to extract the binary from the ZIP file:unzip terraform_<version>_linux_amd64.zipMove the Binary to a Directory in PATH:
Next, you need to move the extracted Terraform binary to a directory that is included in your system's PATH environment variable. This ensures that you can run Terraform commands from any directory in the terminal.
A common directory for storing user binaries is
/usr/local/bin. You can move the Terraform binary to this directory using themvcommand:sudo mv terraform /usr/local/bin/If you encounter permission issues, you may need to use
sudoto execute the command with root privileges.Verify the Installation:
Once you've moved the Terraform binary to a directory in your PATH, you can verify the installation by running the following command:
terraform versionThis command should display the installed Terraform version, confirming that Terraform is correctly set up on your Linux system.
Optional: Configure Terraform Remote State Backend:
Optionally, you may want to configure a remote state backend for storing Terraform state files remotely. This is useful for collaboration and ensuring state consistency across multiple users.
You can configure a backend by adding a backend configuration block to your Terraform configuration files (
main.tf), specifying the backend type and relevant configuration options.Example
backend.tfconfiguration for using AWS S3 as a backend:terraform { backend "s3" { bucket = "your-bucket-name" key = "terraform.tfstate" region = "us-east-1" dynamodb_table = "terraform-lock" } }Replace
your-bucket-namewith the name of your S3 bucket.
With these steps completed, you have successfully set up Terraform on your Linux system. You can now start using Terraform to manage your infrastructure as code.
Essential Terminologies:
- Provider: A provider in Terraform represents a cloud service or platform that offers resources for provisioning. Each provider has its own set of resources and configuration options. For example, to manage resources in AWS, you use the AWS provider.
Example:
provider "aws" {
  region = "us-west-2"
}
- Resource: Resources are the fundamental building blocks of infrastructure defined in Terraform configurations. They represent cloud components such as virtual machines, networks, databases, and more. Resources are declared within Terraform configuration files and are associated with a specific provider.
Example:
resource "aws_instance" "example" {
  ami           = "ami-0c55b159cbfafe1f0"
  instance_type = "t2.micro"
}
- Module: Modules in Terraform are self-contained units of configuration that encapsulate a set of resources with defined inputs and outputs. Modules promote reusability and modularity, enabling the composition of complex infrastructure configurations from smaller, manageable components.
Example:
module "vpc" {
  source = "./vpc"
  vpc_cidr_block = "10.0.0.0/16"
}
- Variable: Variables allow you to parameterize Terraform configurations, making them dynamic and reusable across environments. Variables can be defined within configuration files or provided externally through variable files or environment variables.
Example:
variable "instance_type" {
  description = "Type of EC2 instance"
  default     = "t2.micro"
}
Output: Outputs in Terraform represent values generated during the execution of Terraform configurations. Outputs are useful for referencing or displaying information about provisioned infrastructure, such as IP addresses, DNS names, or configuration details.
Example:
output "instance_ip" { value = aws_instance.example.private_ip }State: Terraform maintains a state file that keeps track of the resources it manages and their current configuration. The state file is crucial for Terraform to understand the desired state of the infrastructure and to plan and execute changes accurately.
Example:
 terraform {
   backend "s3" {
     bucket         = "terraform-state-example"
     key            = "terraform.tfstate"
     region         = "us-east-1"
     dynamodb_table = "terraform-lock"
   }
 }
Data Source: Data sources enable Terraform to fetch information from external sources, such as APIs or existing infrastructure, and use that data within Terraform configurations. Data sources allow for dynamic configuration and integration with external systems.
Example:
data "aws_ami" "example" { most_recent = true owners = ["self"] filter { name = "name" values = ["ubuntu/images/hvm-ssd/ubuntu-focal-20.04-amd64-server-*"] } }Backend: The backend in Terraform determines where the state file is stored and how state locking is handled. Different backends support various storage options, such as local file storage, remote storage services like AWS S3 or Azure Storage, or collaboration platforms like Terraform Cloud or HashiCorp Consul.
Example:
 terraform {
   backend "s3" {
     bucket         = "terraform-state-example"
     key            = "terraform.tfstate"
     region         = "us-east-1"
     dynamodb_table = "terraform-lock"
   }
 }
Provider Configuration Block: The provider configuration block is used to configure settings for a specific provider, such as authentication credentials, regions, and other provider-specific options. Each Terraform configuration can have multiple provider blocks for managing resources across different cloud providers or platforms.
Example:
provider "aws" { region = "us-west-2" }- Terraform Commands: Terraform provides a set of commands for initializing, planning, applying, and managing infrastructure configurations. These commands, such as
terraform init,terraform plan, andterraform apply, are essential for interacting with Terraform and orchestrating infrastructure changes.
- Terraform Commands: Terraform provides a set of commands for initializing, planning, applying, and managing infrastructure configurations. These commands, such as
Example:
    terraform init
    terraform plan
    terraform apply
Below is a simple HCL code of a Terraform configuration file (main.tf) that provisions an AWS EC2 instance:
# Define the AWS provider
provider "aws" {
  region = "us-west-2" # Specify the AWS region
}

# Create an EC2 instance
resource "aws_instance" "example" {
  ami           = "ami-0c55b159cbfafe1f0" # Specify the AMI ID (Amazon Machine Image)
  instance_type = "t2.micro"              # Specify the instance type
}
This configuration:
Specifies the AWS provider with the desired region.
Defines an EC2 instance resource named "example" with the specified AMI ID and instance type.
To use this configuration:
Save the code snippet to a file named
main.tf.Initialize the Terraform working directory by running
terraform initin the directory containingmain.tf.Execute
terraform planto preview the changes that Terraform will make.Finally, run
terraform applyto apply the configuration and provision the EC2 instance.
Make sure to replace the ami value with a valid AMI ID from your AWS account and adjust the region according to your preference.
Conclusion:
TerraWeek's inaugural day marked the beginning of our journey into Terraform's world. We uncovered its role as an Infrastructure as Code (IaC) tool, simplifying infrastructure management through declarative configuration files. Terraform's cross-cloud compatibility streamlines provisioning across various providers, enhancing efficiency and scalability.
We delved into Terraform's installation on Linux, from downloading the binary to configuring environment variables. Additionally, we explored key terminologies like providers, resources, and modules, laying the groundwork for future Terraform endeavors.
Stay tuned for more insights as we delve deeper into mastering Terraform, transforming infrastructure management through automation and code. Welcome to TerraWeek, where infrastructure dreams become reality!