Table of contents
- Task 1: Understanding Terraform Providers
- Comparing Terraform Providers:
- 1. AWS Provider:
- 2. Azure Provider:
- 3. Google Cloud Provider:
- 4. Other Cloud Providers:
- Task 2: Provider Configuration and Authentication
- AWS Provider:
- Azure Provider:
- Google Cloud Provider:
- Other Providers:
- Task 3: Hands-on Practice with Providers
- Step 1: Preparation
- Step 2: Define Provider and Resources
- Step 3: Authentication (If Required)
- Step 4: Terraform Plan and Apply
- Step 5: Experiment and Update
- Step 6: Destroy Resources
- Conclusion:
- Happy Terraforming! 🚀🌍💻
Greetings fellow Terraform enthusiasts! Welcome to Day 6 of our TerraWeek challenge. Today, we embark on an exhilarating journey into the heart of Terraform providers, unraveling their intricacies and mastering their capabilities across various cloud platforms. So, grab your favorite beverage, settle into your coding sanctuary, and let's dive headfirst into the realm of Terraform magic!
Task 1: Understanding Terraform Providers
Demystifying Terraform Providers:
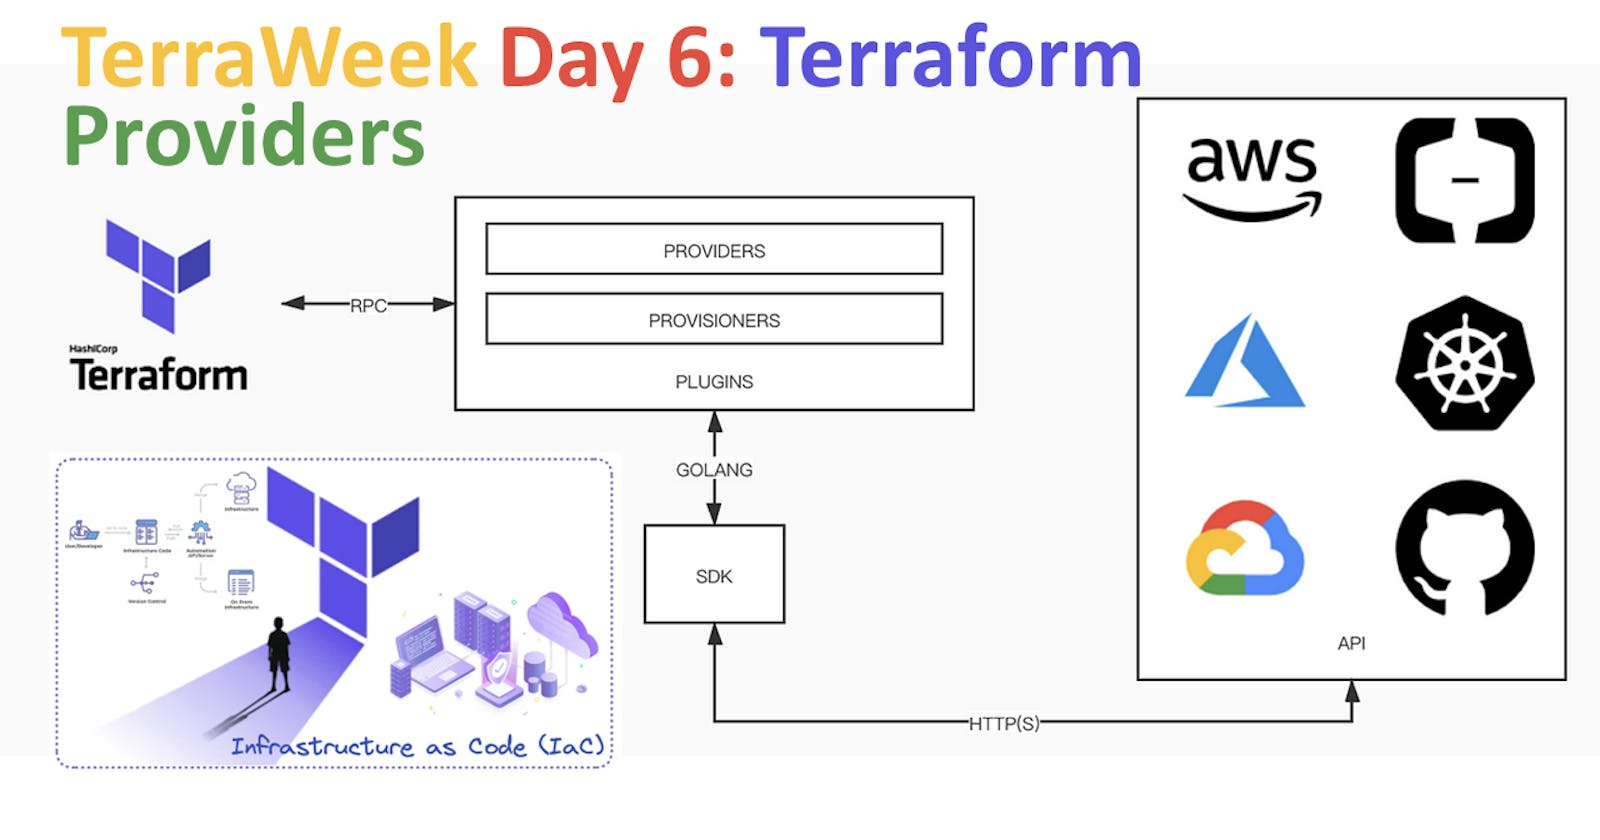
Terraform providers are the lifeblood of infrastructure management, acting as bridges between Terraform configurations and the APIs of different cloud providers. These plugins abstract away the complexities of interacting with diverse APIs, allowing us to define our infrastructure needs using a unified, elegant syntax.
Why Terraform Providers Matter:
Imagine a world where you can provision resources on AWS, Azure, Google Cloud, and more, all from a single configuration file. That's the power of Terraform providers! With multi-cloud support and a consistent workflow, Terraform empowers us to manage resources effortlessly across heterogeneous environments.
Comparing Terraform Providers:
Terraform providers serve as the backbone for infrastructure management, enabling users to interact with cloud services and resources across various platforms. Here's a comprehensive comparison of some of the leading Terraform providers:

1. AWS Provider:
Features:
Extensive Coverage: Offers comprehensive support for a wide range of AWS services, including EC2, S3, RDS, VPC, IAM, Lambda, and more.
Auto-Scaling: Provides features for auto-scaling infrastructure resources based on demand, enhancing flexibility and efficiency.
Advanced Networking: Supports features like CloudFront distributions, Route 53 DNS management, and Virtual Private Cloud (VPC) configurations.
Integration:
Seamlessly integrates with AWS services and APIs, providing a unified experience for managing cloud resources.
Offers integration with AWS Identity and Access Management (IAM) for robust access control and security.
Data Sources:
Provides a rich set of data sources and configuration options, enabling precise control over AWS resources.
Offers detailed documentation and examples for seamless resource provisioning and management.
2. Azure Provider:
Features:
Azure Service Coverage: Supports a wide array of Azure services, including virtual machines, storage accounts, databases (SQL, Cosmos DB), virtual networks, and more.
ARM Template Integration: Integrates with Azure Resource Manager (ARM) templates, allowing users to leverage existing infrastructure definitions.
Identity and Access Management: Offers integration with Azure Active Directory (AAD) for identity management and role-based access control (RBAC).
Integration:
Seamlessly integrates with Azure services and management APIs, providing a cohesive experience for infrastructure provisioning and management.
Supports Azure-specific features and configurations, ensuring compatibility with Azure environments.
Data Sources:
Provides extensive data sources and resource configurations for efficient management of Azure resources.
Offers Azure-specific documentation and examples for easy adoption and deployment.
3. Google Cloud Provider:
Features:
Comprehensive GCP Support: Covers a wide range of Google Cloud Platform (GCP) services, including Compute Engine, Cloud Storage, BigQuery, Kubernetes Engine, and more.
IAM Integration: Integrates with Google Cloud IAM for access control and identity management, ensuring secure resource provisioning.
Data Analytics Capabilities: Offers features for data analytics and processing, including BigQuery integration and data pipeline management.
Integration:
Seamlessly integrates with Google Cloud services and APIs, providing a unified interface for managing GCP resources.
Offers support for Google Cloud-specific configurations and features, enabling smooth deployment and management.
Data Sources:
Provides robust data sources and resource configurations tailored for seamless management of GCP resources.
Offers detailed documentation and examples for efficient resource provisioning and deployment.
4. Other Cloud Providers:
Additional Provider Support:
Terraform also extends support for other cloud platforms, such as IBM Cloud, Oracle Cloud Infrastructure (OCI), Alibaba Cloud, and more.
These providers offer features and resources specific to their platforms, enabling users to manage resources across diverse environments.
Considerations for Provider Selection:
Feature Coverage: Evaluate the breadth and depth of features supported by each provider to ensure compatibility with infrastructure requirements.
Community Support: Consider community activity, documentation quality, and ongoing development efforts for each provider to gauge long-term support and reliability.
Vendor Lock-in: Assess the implications of using specific providers on vendor lock-in and interoperability with other cloud platforms, ensuring flexibility and scalability.
By comparing the features, integration capabilities, and considerations for each Terraform provider, users can make informed decisions when selecting the appropriate provider for their infrastructure needs. Whether provisioning resources on AWS, Azure, Google Cloud, or other platforms, Terraform empowers users to manage cloud infrastructure efficiently and effectively.

Task 2: Provider Configuration and Authentication
Configuring authentication for Terraform providers is crucial for accessing and managing resources on different cloud platforms. Let's delve into the process of setting up authentication for some popular Terraform providers:

AWS Provider:
Access Key and Secret Key: The most common method for authenticating with AWS is by providing an access key ID and a secret access key. These credentials can be obtained from the AWS Management Console.
Configuration Example:
provider "aws" {
  region     = "us-west-2"
  access_key = "YOUR_ACCESS_KEY_ID"
  secret_key = "YOUR_SECRET_ACCESS_KEY"
}
Azure Provider:
Service Principal: Authentication with Azure is typically done using a service principal, which is a security identity used by applications, services, and automation tools to access Azure resources.
Configuration Example:
provider "azurerm" {
  features {}
  subscription_id = "YOUR_SUBSCRIPTION_ID"
  client_id       = "YOUR_CLIENT_ID"
  client_secret   = "YOUR_CLIENT_SECRET"
  tenant_id       = "YOUR_TENANT_ID"
}
Google Cloud Provider:
Service Account: Google Cloud authentication involves using a service account key file that contains the necessary credentials for authenticating with GCP.
Configuration Example:
provider "google" {
  credentials = file("path/to/service-account-key.json")
  project     = "YOUR_PROJECT_ID"
  region      = "us-central1"
}
Other Providers:
Each Terraform provider may have its own authentication method. For example, providers like Alibaba Cloud may use an AccessKey and SecretKey similar to AWS, while others like IBM Cloud may utilize API keys or IAM tokens.
Best Practices:
Credentials Management: Always use secure methods for storing and managing credentials, such as environment variables, encrypted files, or secret management services like HashiCorp Vault.
Least Privilege: Assign the minimum required permissions to the credentials used by Terraform to reduce the risk of unauthorized access or accidental resource modification.
Rotation: Regularly rotate credentials to mitigate the impact of potential credential exposure or compromise.
Authentication Variables: To avoid hardcoding sensitive authentication details in Terraform configurations, consider using input variables or environment variables to pass credentials dynamically.
By configuring authentication for Terraform providers following best practices, users can securely interact with cloud platforms and manage resources effectively using Terraform configurations.
Task 3: Hands-on Practice with Providers
Now that we've explored the significance of Terraform providers and configured authentication, let's gain some hands-on experience by using Terraform providers for our chosen cloud platform.
Step 1: Preparation
Create a New Directory: Create a new directory for your Terraform project. You can name it anything you like. For example:
 mkdir terraform_project
 cd terraform_project
Initialize Terraform: Run the following command to initialize Terraform within your project directory:
terraform init
Step 2: Define Provider and Resources
Create a Configuration File: Within your project directory, create a Terraform configuration file. You can name it
main.tf:touch main.tfDefine Provider: Open
main.tfin a text editor and define the provider you want to use. For example, if you're using AWS:provider "aws" { region = "us-east-1" }Define Resources: Below the provider configuration, define the resources you want to create. This could be EC2 instances, S3 buckets, or any other supported resource. For example:
 resource "aws_instance" "example" {
   ami           = "ami-12345678"
   instance_type = "t2.micro"
 }
Step 3: Authentication (If Required)
If your provider requires authentication, make sure you've configured it correctly as discussed in Task 2.
Step 4: Terraform Plan and Apply
Plan Changes: Run the following command to see what Terraform will do when you apply the configuration:
terraform planApply Changes: If the plan looks good, apply the changes:
terraform apply
Step 5: Experiment and Update
Experiment with different configurations in your main.tf file. Add new resources, modify existing ones, or change configuration parameters.
Step 6: Destroy Resources
Once you're done experimenting, clean up the resources to avoid unnecessary costs. Use the following command:
terraform destroy
Conclusion:
Day 6 of our TerraWeek challenge has been an enlightening exploration of Terraform providers. We've delved into their significance, compared their features across different cloud platforms, and mastered the process of configuring authentication. Hands-on practice has solidified our understanding, empowering us to manage infrastructure efficiently.
As we conclude, let's carry forward our newfound knowledge and skills, ready to tackle the next phase of our Terraform journey with confidence. Happy Terraforming, and may our infrastructure always reflect the brilliance of our endeavors!
