Setting Up Two-Tier Application Deployment on Kubernetes Cluster: A Step-by-Step Guide Introduction:


Kubernetes and its importance in modern application deployment.
Kubernetes is an open-source container orchestration platform that automates the deployment, scaling, and management of containerized applications. Its importance in modern application deployment lies in its ability to provide scalability, resilience, portability, declarative configuration, service discovery, load balancing, resource utilization, and extensibility. Kubernetes is crucial for deploying microservices-based architectures, enabling CI/CD pipelines, practicing infrastructure as code, and managing hybrid and multi-cloud environments efficiently.
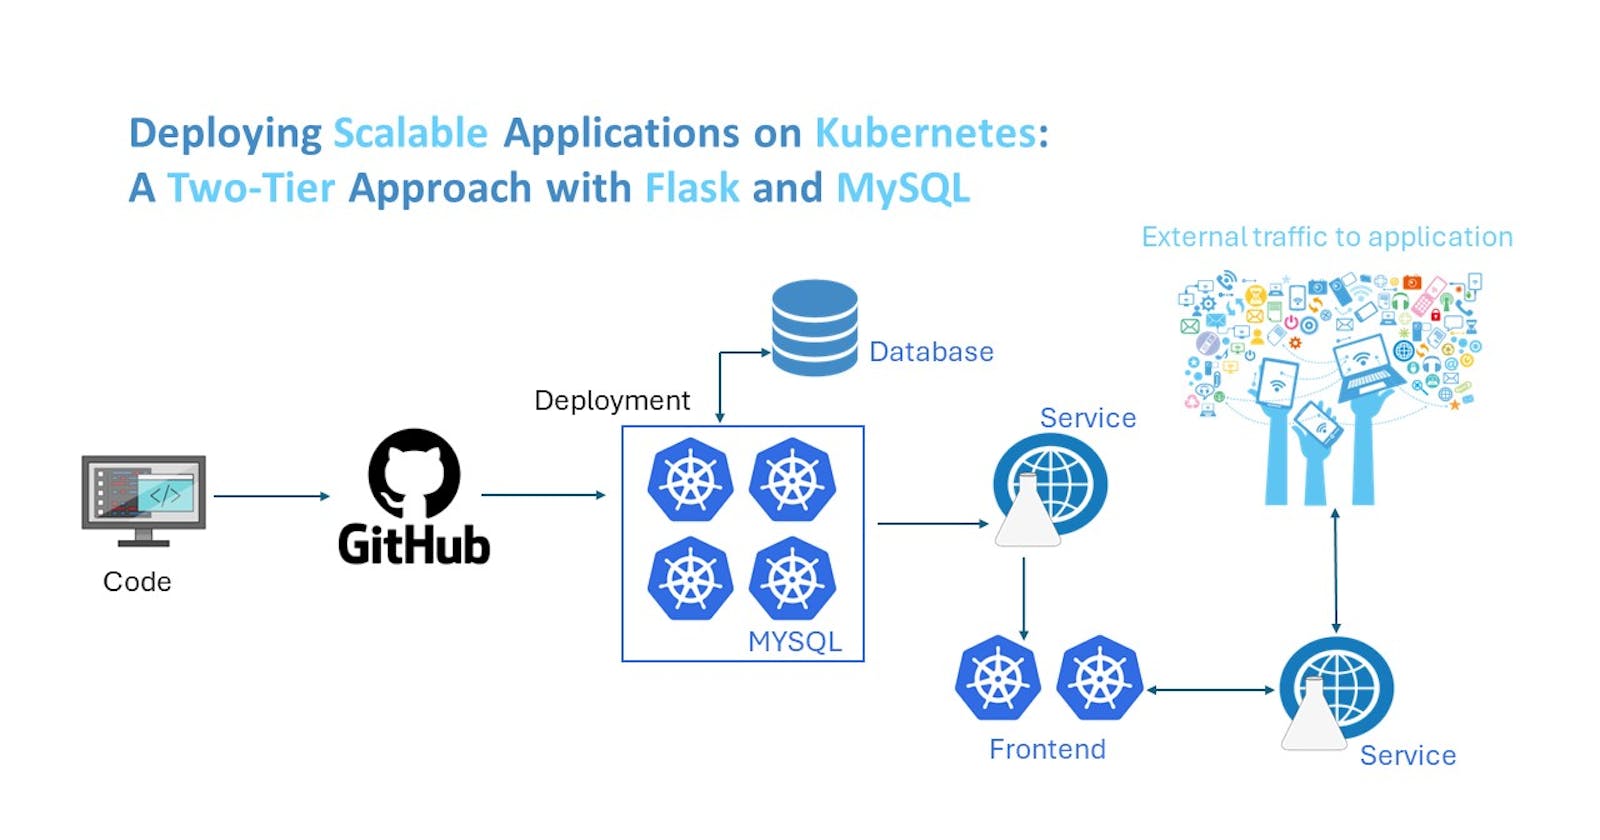
Introduction to two-tier application architecture and its benefits.
project utilizes a two-tier architecture employing Flask for the front-end and MySQL for the back-end. This setup provides simplicity and rapid development with Flask, while MySQL ensures scalability and efficient data management. With Flask's flexibility and MySQL's performance optimizations, your application benefits from a tailored, efficient, and easily deployable architecture.
Purpose of the blog:
The purpose of the blog is to provide a step-by-step guide for readers to set up a two-tier application deployment on a Kubernetes cluster using AWS. Through clear instructions and explanations, the blog aims to help readers understand the process and successfully deploy their applications on Kubernetes, leveraging the infrastructure provided by AWS.
Prerequisites:
Basic understanding of Kubernetes concepts.
An AWS account.
kubectlandminikubeinstalled locally.
For detailed instructions on how to install minikube and kubectl locally, please refer to my previous blog post at Minikube Installation Guide for Ubuntu (hashnode.dev).
step 1: Clone the Repository:
Clone the GitHub repository containing the sample two-tier Flask application.
git clone https://github.com/LondheShubham153/two-tier-flask-app.git

Step 2: Set up MySQL Persistent Volume and Deployment:
Navigate to the project directory:
cd two-tier-flask-appCreate a directory for MySQL data and apply the PersistentVolume (PV) configuration:
 mkdir mysqldata
 cd k8s
 kubectl apply -f mysql-pv.yml
apiVersion: v1 kind: PersistentVolume metadata: name: mysql-pv spec: capacity: storage: 256Mi volumeMode: Filesystem accessModes: - ReadWriteOnce persistentVolumeReclaimPolicy: Retain hostPath: path: /home/ubuntu/two-tier-flask-app/mysqldata #This is your host path where your data will be stored. Make sure to create mysqldata directory in mentioned path
This YAML configuration defines a PersistentVolume named
mysql-pv. PersistentVolumes are used in Kubernetes to provide persistent storage for applications.In this configuration:
capacityspecifies the storage capacity of the PersistentVolume, set to 256MiB.volumeModeindicates that the volume will function as a filesystem.accessModesspecify how the volume can be accessed by Pods. In this case, it allows ReadWriteOnce access, meaning it can be mounted as read-write by a single node.persistentVolumeReclaimPolicydetermines what happens to the volume when it's released by its claimants. Here, it's set to 'Retain', which means the volume will be retained and not automatically deleted.hostPathdefines the host directory where the data will be stored. Ensure that the directory/home/ubuntu/two-tier-flask-app/mysqldataexists on your host machine before applying this configuration. This directory will hold the persistent data for MySQL
Verify the creation of PersistentVolume:
kubectl get pvApply PersistentVolumeClaim (PVC) configuration:
kubectl apply -f mysql-pvc.ymlapiVersion: v1 kind: PersistentVolumeClaim metadata: name: mysql-pvc spec: accessModes: - ReadWriteOnce resources: requests: storage: 256Mi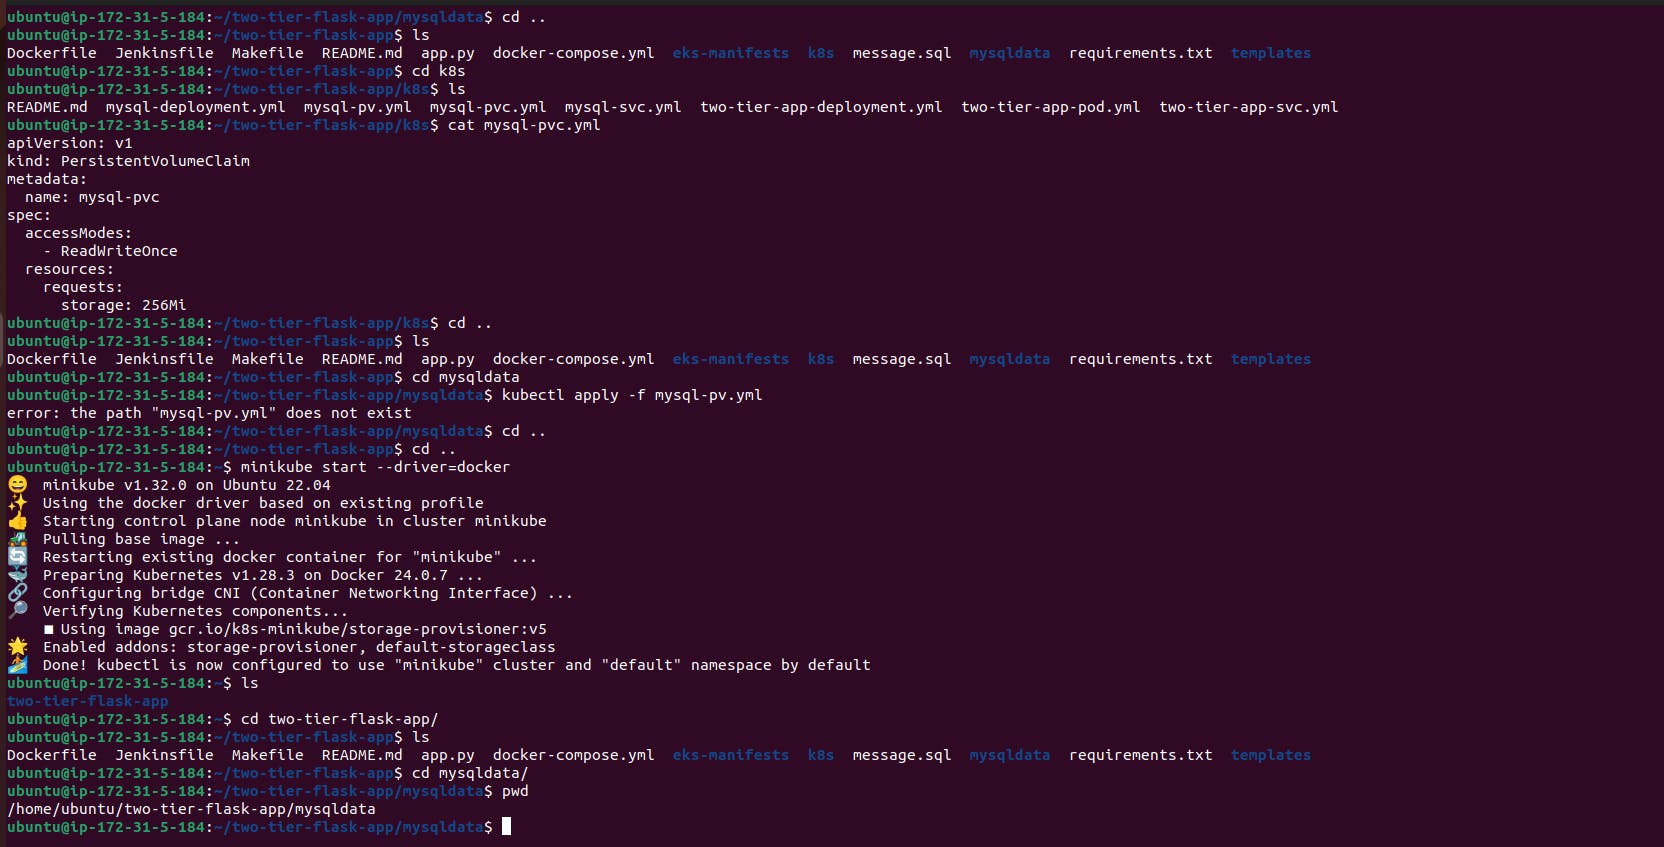
This YAML snippet defines a PersistentVolumeClaim (PVC) named
mysql-pvc, which is used to request storage resources from the Kubernetes cluster.apiVersion: v1: Specifies the Kubernetes API version being used, in this case, version 1.kind: PersistentVolumeClaim: Indicates the type of Kubernetes resource being defined, which is a PersistentVolumeClaim in this case. A PersistentVolumeClaim is used to request storage resources from the cluster.metadata: Contains metadata information about the PVC, such as its name.name: mysql-pvc: Specifies the name of the PersistentVolumeClaim, which ismysql-pvc.
spec: Specifies the desired state of the PersistentVolumeClaim, including access modes and resource requests.accessModes: Defines the access modes for the PVC. In this case, it specifiesReadWriteOnce, meaning the volume can be mounted as read-write by a single node.resources: Specifies the requested resources for the PVC.requests: Specifies the resource requests made by the PVC. Here, it requests storage resources.storage: 256Mi: Requests a minimum of 256 megabytes of storage for the PVC.
In summary, this YAML snippet defines a PersistentVolumeClaim named mysql-pvc, which requests storage resources with a minimum capacity of 256 megabytes and specifies that it can be mounted as read-write by a single node. This PVC will be used by other Kubernetes resources, such as pods, to dynamically provision storage from the cluster.
Verify the creation of PersistentVolumeClaim:
kubectl get pvcDeploy MySQL using the provided deployment configuration:
kubectl apply -f mysql-deployment.ymlapiVersion: apps/v1 kind: Deployment metadata: name: mysql labels: app: mysql spec: replicas: 1 selector: matchLabels: app: mysql template: metadata: labels: app: mysql spec: containers: - name: mysql image: mysql:latest env: - name: MYSQL_ROOT_PASSWORD value: "admin" - name: MYSQL_DATABASE value: "mydb" - name: MYSQL_USER value: "admin" - name: MYSQL_PASSWORD value: "admin" ports: - containerPort: 3306 volumeMounts: - name: mysqldata mountPath: /var/lib/mysql # this is your container path from where your data will be stored volumes: - name: mysqldata persistentVolumeClaim: claimName: mysql-pvc # PVC claim name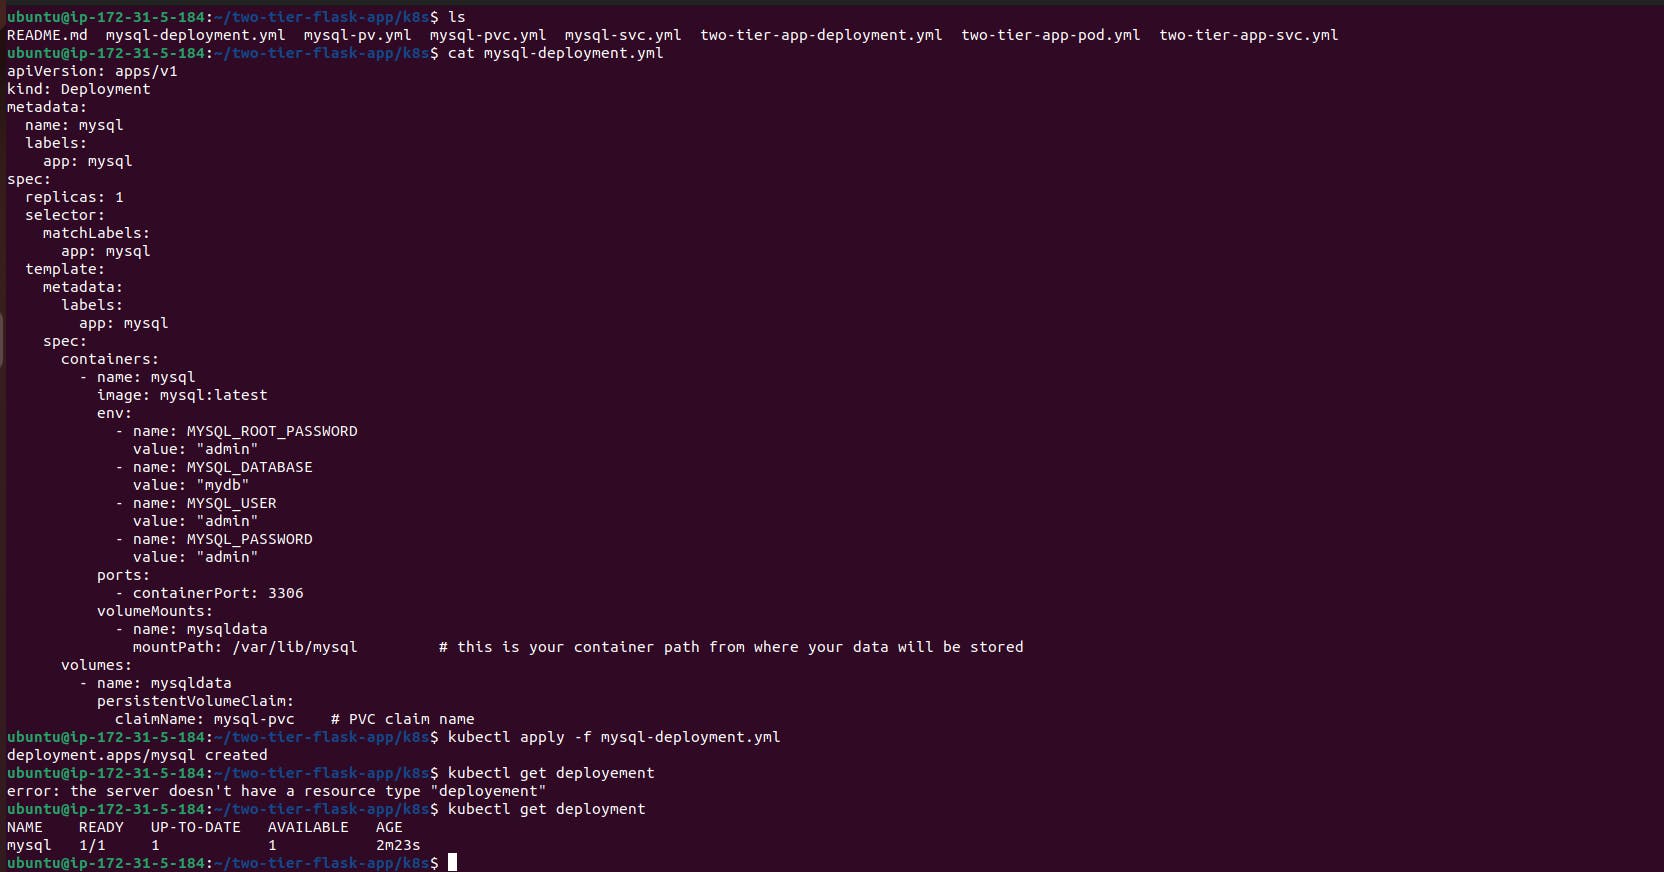
Explanation:
apiVersionandkindspecify the Kubernetes API version and resource type, respectively. In this case, it's a Deployment resource of theapps/v1API version.metadatacontains information about the Deployment, such as its name and labels.specdefines the desired state for the Deployment.replicasspecifies the desired number of replicas (instances) of the Pod template.selectorspecifies how Pods should be selected for the Deployment. Pods with matching labels will be managed by this Deployment.templatecontains the Pod template used to create new Pods.metadatacontains labels for Pods created from this template.specdefines the Pod's specification.containerslists the containers running in the Pod.namespecifies the container's name.imagespecifies the Docker image used for the container (in this case, the latest MySQL image).envlists environment variables passed to the container, including MySQL configuration (root password, database name, user, and password).portsspecifies the container's ports to expose (MySQL typically uses port 3306).volumeMountsmounts the persistent volume (mysqldata) to the container's filesystem at/var/lib/mysql, where MySQL stores its data.
volumesdefines the volumes available to the Pod.namespecifies the volume's name.persistentVolumeClaimdefines a PersistentVolumeClaim (PVC) to provide persistent storage for the MySQL data.
This configuration defines a Kubernetes Deployment for MySQL, ensuring high availability and data persistence using persistent storage.
Verify the deployment and check the status of pods:
 kubectl get deployment
 kubectl get pods
Step 3: Set up MySQL Service:
Apply the MySQL Service configuration:
kubectl apply -f mysql-svc.ymlapiVersion: v1 kind: Service metadata: name: mysql spec: selector: app: mysql ports: - port: 3306 targetPort: 3306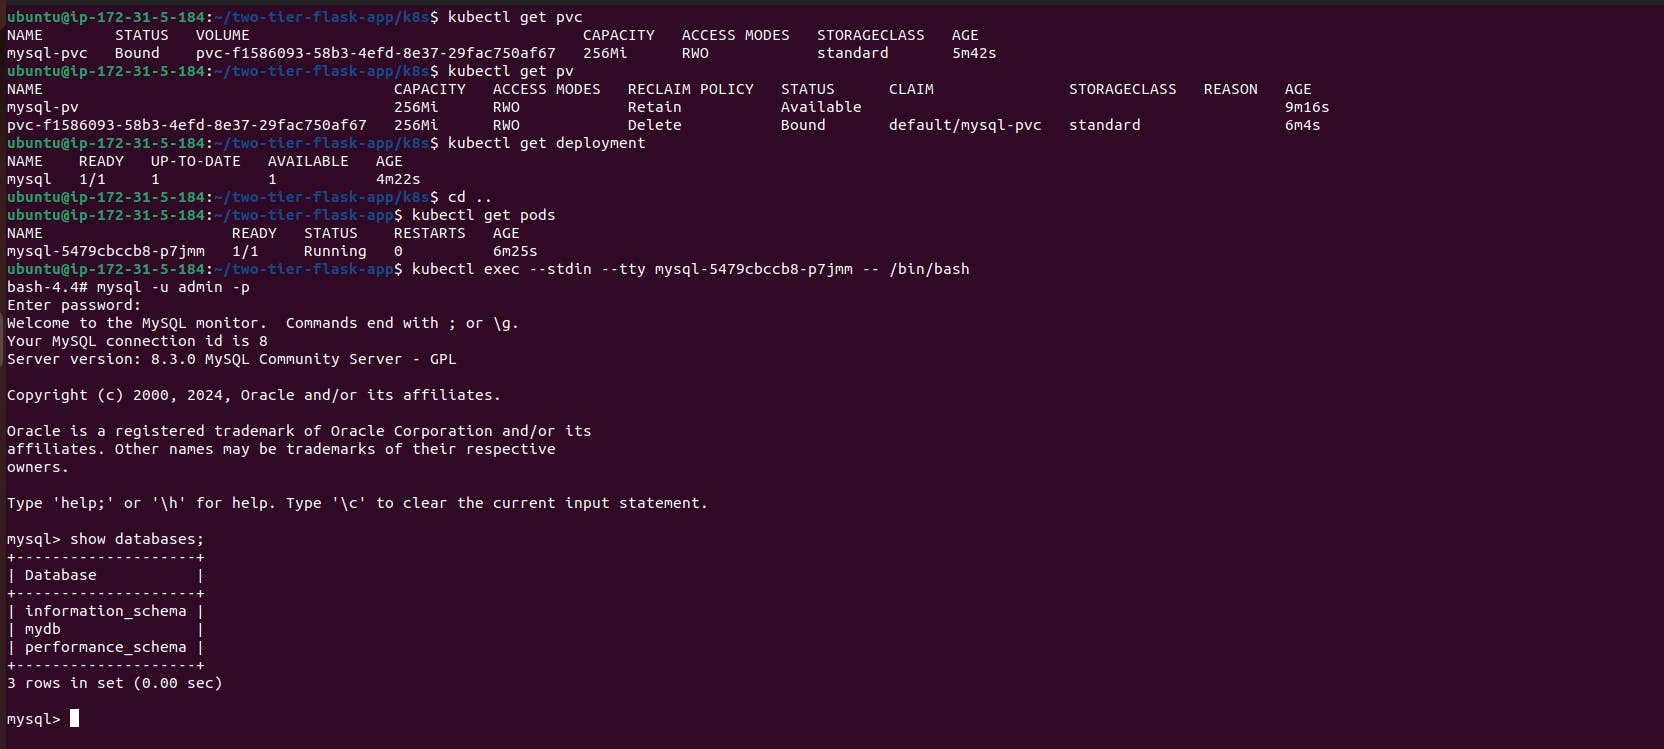
apiVersion: Specifies the version of the Kubernetes API being used. In this case, it'sv1, which is the core Kubernetes API version.kind: Defines the type of Kubernetes resource being created, which is aServicein this case. A Service in Kubernetes is responsible for defining a logical set of Pods and a policy to access them.metadata: Contains metadata about the Service, such as its name.spec: Specifies the desired state of the Service.selector: Specifies a label selector to determine which Pods the Service should target. In this case, it selects Pods with the labelapp: mysql, meaning that this Service will route traffic to Pods labeled withapp: mysql.ports: Specifies the ports that the Service will expose.port: The port on which the Service will listen for incoming traffic. In this case, it's port3306, commonly used for MySQL databases.targetPort: The port on the Pods to which the incoming traffic will be forwarded. In this case, it's also3306, matching the port where MySQL is running inside the Pods.
In summary, this YAML snippet defines a Kubernetes Service named mysql that routes incoming traffic on port 3306 to Pods labeled with app: mysql, effectively exposing the MySQL database service within the Kubernetes cluster.
Verify the creation of the service:
kubectl get svc
Step 4: Configure and Deploy the Two-Tier Application
Open
two-tier-app-deployment.ymlin a text editor and replace the placeholder IPs with the actual MySQL service IP.Apply the application deployment configuration:
kubectl apply -f two-tier-app-deployment.ymlapiVersion: apps/v1 kind: Deployment metadata: name: two-tier-app labels: app: two-tier-app spec: replicas: 1 selector: matchLabels: app: two-tier-app template: metadata: labels: app: two-tier-app spec: containers: - name: two-tier-app image: trainwithshubham/flaskapp:latest env: - name: MYSQL_HOST value: "10.98.19.211" # this is your mysql's service clusture IP, Make sure to change it with yours - name: MYSQL_PASSWORD value: "admin" - name: MYSQL_USER value: "root" - name: MYSQL_DB value: "mydb" ports: - containerPort: 5000 imagePullPolicy: Always

Explanation:
apiVersion: Specifies the API version being used. In this case, it'sapps/v1, indicating the Deployment resource from the "apps" API group and version 1.kind: Defines the type of Kubernetes resource being defined. Here, it's a Deployment, which manages a replicated set of Pods.metadata: Contains metadata about the Deployment, such as its name and labels.name: Specifies the name of the Deployment.labels: Defines labels to identify and categorize the Deployment.
spec: Describes the desired state of the Deployment.replicas: Specifies the desired number of replicas (instances) of the application to run. In this case, it's set to 1 replica.selector: Defines how the Deployment identifies which Pods it manages.matchLabels: Specifies the labels that Pods must have to be managed by this Deployment.
template: Defines the Pod template used to create new Pods.metadata: Contains labels for the Pod.spec: Specifies the configuration for the Pod.containers: Specifies the containers running in the Pod.name: Specifies the name of the container.image: Specifies the Docker image used for the container.env: Specifies environment variables for the container.name: Specifies the name of the environment variable.value: Specifies the value of the environment variable.
ports: Specifies the ports that the container listens on.containerPort: Specifies the port number.
imagePullPolicy: Specifies when to pull the Docker image. In this case, it's set toAlways, meaning Kubernetes will always pull the latest version of the image.
This YAML configuration defines a Deployment for a Flask application container, specifying environment variables for connecting to a MySQL database and exposing port 5000 for accessing the application.
Apply the service configuration for the two-tier application:
kubectl apply -f two-tier-app-svc.ymlapiVersion: v1 kind: Service metadata: name: two-tier-app-service spec: selector: app: two-tier-app ports: - protocol: TCP port: 80 targetPort: 5000 nodePort: 30004 type: NodePort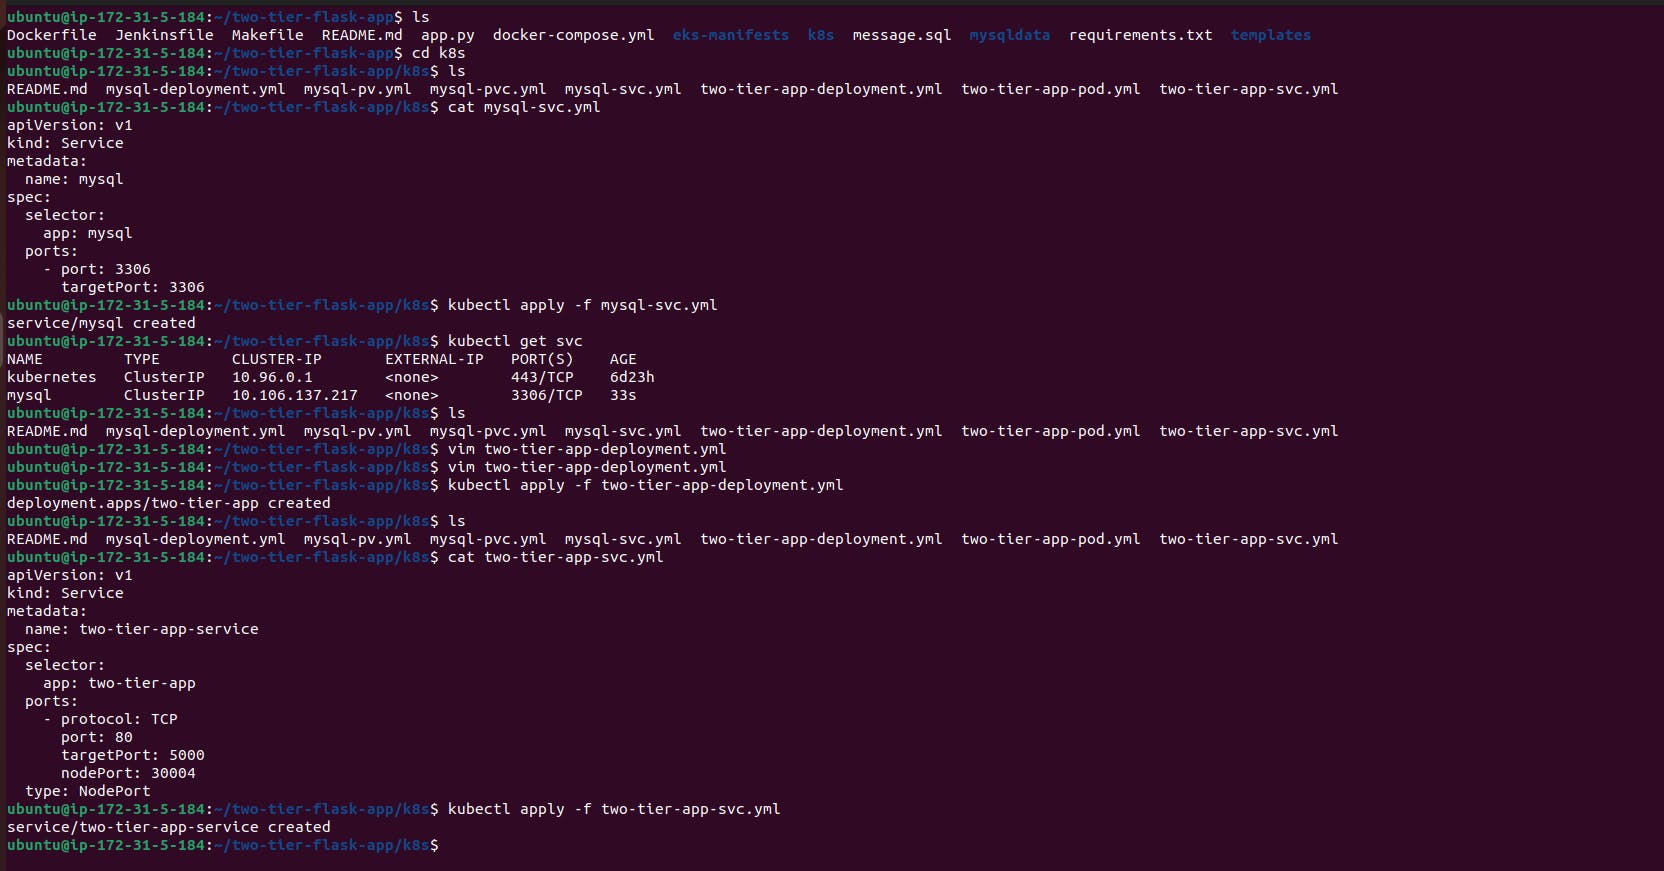
Explanation:
apiVersion: v1: Specifies the Kubernetes API version being used for this resource, in this case, version 1.kind: Service: Indicates that this resource is a Kubernetes Service, which is responsible for defining a set of pods and enabling network access to them.metadata: Contains metadata about the Service, such as its name.name: two-tier-app-service: Specifies the name of the Service as "two-tier-app-service".
spec: Defines the desired state of the Service.selector: Specifies a label selector that identifies the set of pods to expose via the Service.app: two-tier-app: Labels pods with the key "app" and value "two-tier-app" are selected to be included in this Service.
ports: Specifies the ports that the Service should listen on.- protocol: TCP: Specifies the protocol used for the port, which is TCP in this case.- port: 80: Specifies the port number that the Service will listen on internally.- targetPort: 5000: Specifies the port number that the Service will route traffic to on the selected pods.- nodePort: 30004: Specifies the port number that the Service will listen on at the cluster node level. This enables external access to the Service from outside the cluster.
type: NodePort: Specifies the type of Service. In this case, it is a NodePort Service, which exposes the Service on a port at each cluster node's IP. This allows external traffic to reach the Service.
This Service manifest essentially defines how external traffic will be directed to the pods labeled with "app: two-tier-app", allowing access to the two-tier application deployed on Kubernetes.
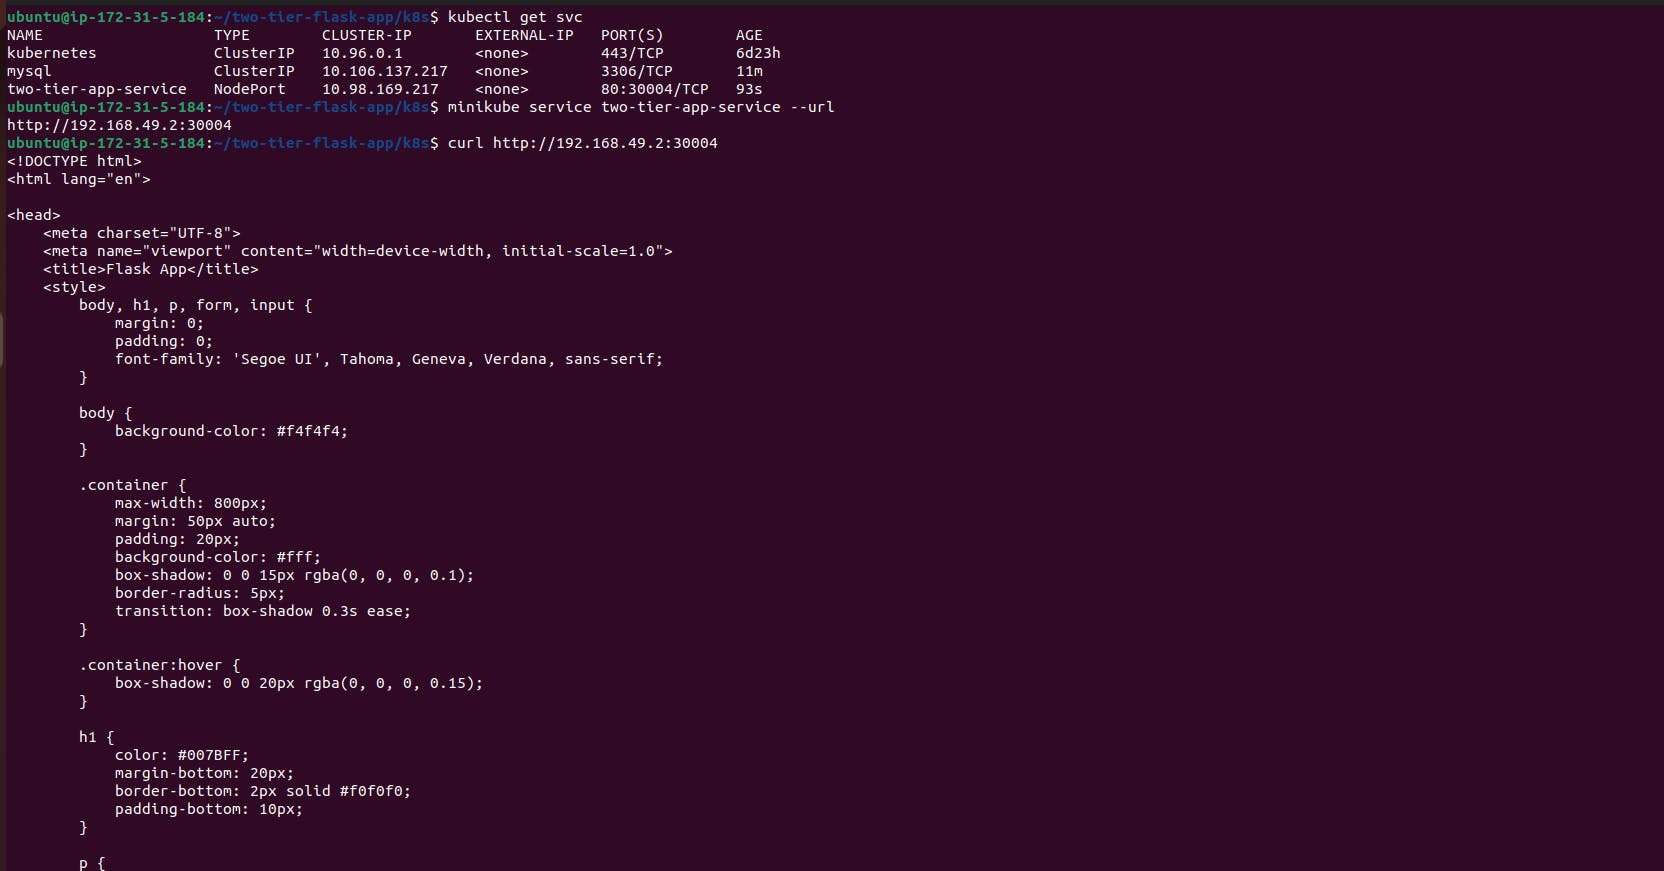
Verify the creation of the application service:
kubectl get svc
Step 5: Access the Application:
Retrieve the URL to access the application:
minikube service two-tier-app-service --url
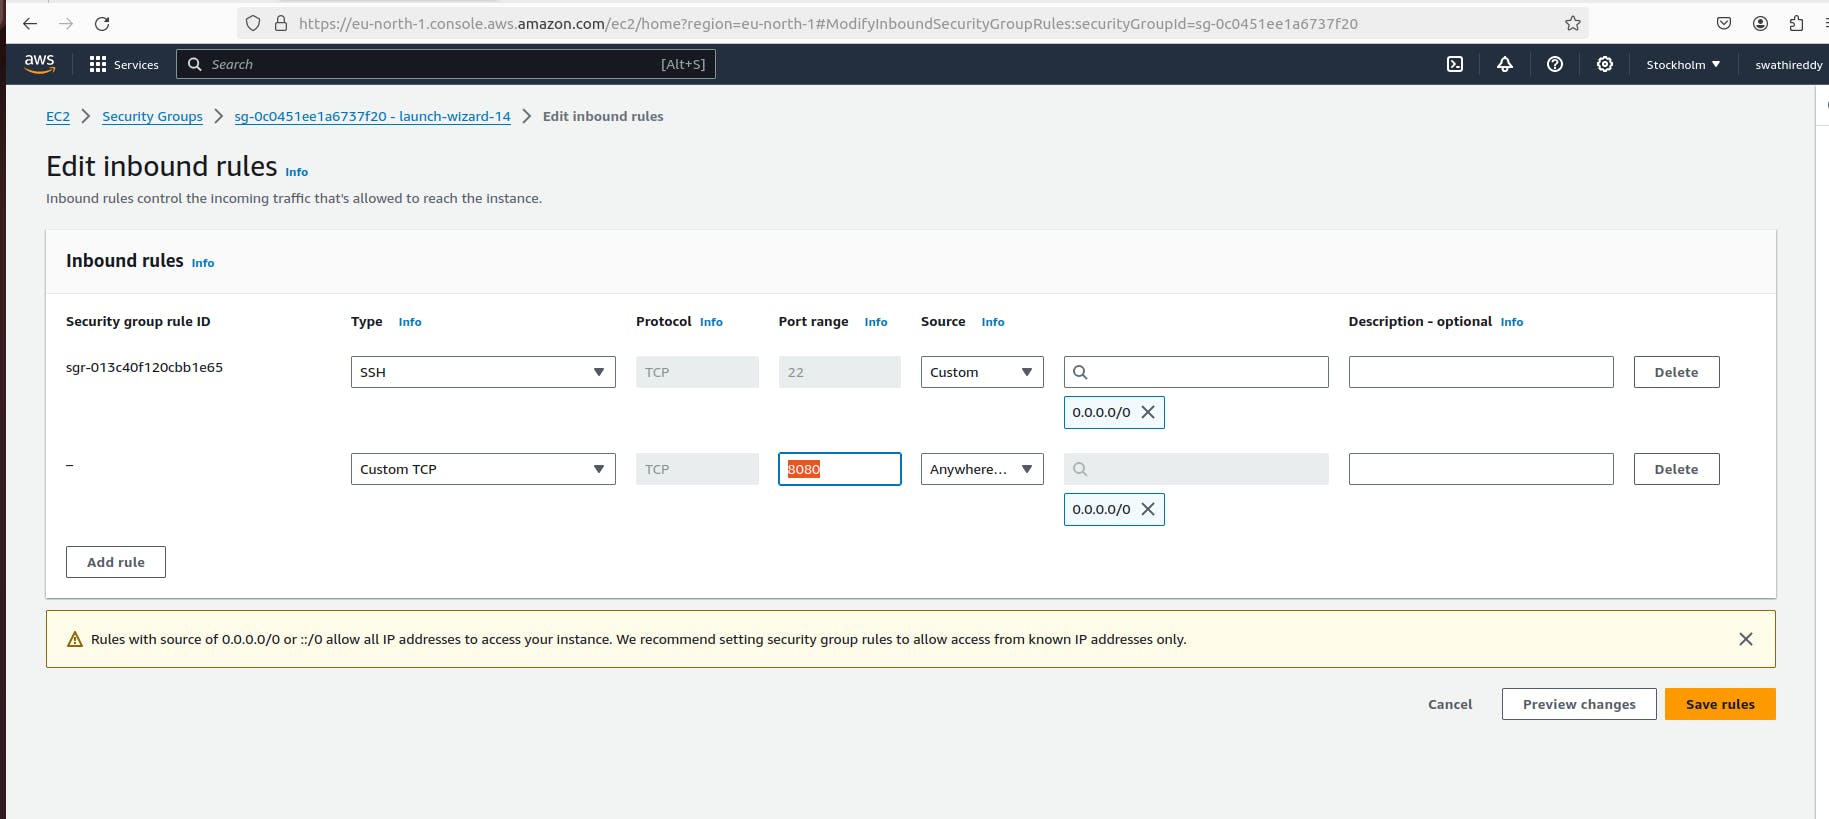
Port-forward the service to your local machine:
kubectl port-forward service/two-tier-app-service --address 0.0.0.0 8080:80Update AWS inbound rules to allow traffic on port 8080.
Open a web browser and navigate to the application URL (
<IP>:8080) to view the deployed application.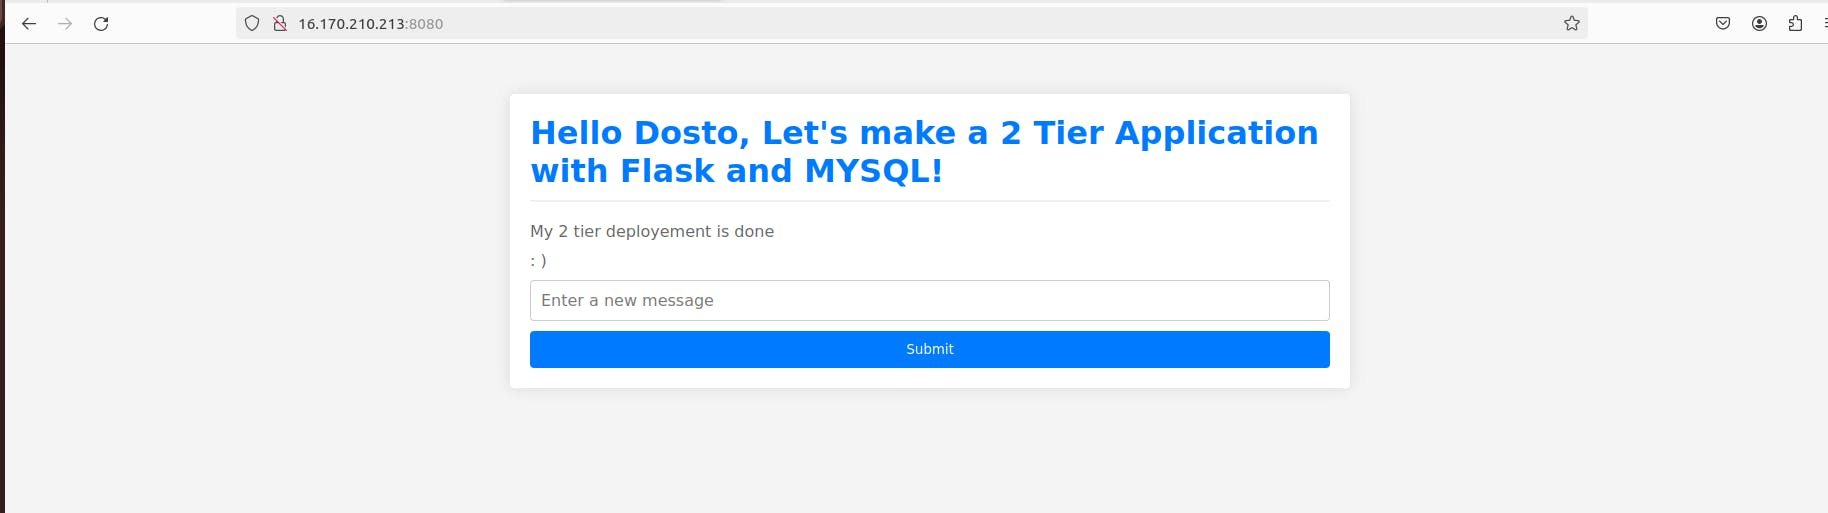
Conclusion:
In conclusion, we've walked through the steps to set up a two-tier application deployment on a Kubernetes cluster, leveraging the power of AWS infrastructure. We've seen how Kubernetes simplifies the deployment process while offering scalability and flexibility to manage complex application architectures effectively.
Kubernetes' ability to automate scaling, load balancing, and self-healing mechanisms ensures optimal performance and reliability for our applications. As you continue your journey with Kubernetes, I encourage you to explore its diverse features and best practices further. Delving deeper into Kubernetes can unlock even more possibilities for building and managing resilient, scalable applications in today's dynamic computing landscape.